How to Turn Your Kettle Grill into a Smoker

Hank Shaw spent a day this week with my father and me, showing us how to smoke ribs on my kettle grill. As worried as I was that the ribs were going to end up dry, they weren’t, and they were the some of the best I’ve ever had. Here’s the process from Hank.
Barbecue can be a serious business. Hard-core ‘cue mavens buy or build special smokers with custom-made rotisseries and fireboxes in order to precisely control the level of heat and smoke needed for each type of meat or fish.
Most of us aren’t ready to drop several hundred—even several thousand—dollars on a special smoker. But you can ‘cue at home, even with that simplest of grills—the “egg” or kettle grill Weber made famous in the 1950s.
No, you will not get competition-class barbecue every time, because you cannot control your temperature with a kettle grill as well as you can with the expensive smokers. But you can still easily achieve the proper “slow and low” cooking so critical for barbecue.
One of my favorite things to barbecue is ribs, so I’ll use a Kentucky-style bourbon-glazed baby back rib recipe as an example. The larger St. Louis or Memphis cut ribs will work with this method, too, as will a Boston butt for when you want to make pulled pork. I’ve made perfectly barbecued “country ribs” (thick cuts from the pork shoulder) with a kettle, as well as beef ribs, brisket, tri-tip, chicken legs and thighs – even fatty fish such as salmon, sturgeon, bluefish or mackerel.

How to Turn Your Kettle Grill into a Smoker
1. Prep your meat and wood. I like to brine pork in a salt-sugar solution. Mine is typically 1/4 cup kosher salt with 1/2 cup brown sugar mixed with 4 cups of water. You can add any spices or herbs you want. How long? 3-6 hours for ribs or even overnight for a pork butt.
Get your smoking wood ready by soaking it in water for at least 2 hours. Overnight is better. And when you are using a kettle grill, make sure you have wood chips: Not big blocks, not sawdust. Chips.

Anywhere from an hour to a day before you start cooking – depending on how deeply spiced you want your meat – you can remove your meat from the brine and apply a dry rub to the meat. This is optional, especially if you have a full-flavored sauce. But most professional pit masters will use a rub as a base flavor with a sauce that complements it.
2. Place water pans in the grill. Start barbecuing by getting your hands on some cheap metal pans you can fill with water. Disposable tin pans from the supermarket are great for this, and you do not have to toss them after each use. Fill these pans halfway with water and place them beneath the meat you are barbecuing. You want the pan or pans to take about half the space at the bottom of the grill.
Why water pans? Several reasons. First, it lets sauce and fat drip into something that will not wreck the bottom of your grill or cause flareups. Second, it helps keep the meat moist, which helps smoke adhere to the meat. Third, it moderates the temperature around the meat, which is vital in such a small space.
3. Get the coals hot and put water-soaked wood chips on the coals. A chimney starter is the easiest way to get the coals lit for the grill. What kind of fuel should you use? Up to you, of course, but I would use either standard briquettes or lump hardwood charcoal. I am especially fond of lump charcoal because I get a better flavor and a cleaner smoke. Could you go all wood? Sure, but it needs to be something like oak or hickory, which burn steadily and slowly. And no logs! You must use chunks.


Your life will be easier if you have a grill top that has hinged edges that lift up. These allow you to position one end over the coals and add more charcoal or wood as needed as you cook. If you do not have one of these grill tops, make sure you can slip briquettes through the slim opening. If you cannot, you can carefully lift the whole grate and add more when needed.
Once the coals are good and hot, add a couple handfuls of the soaked wood on the coals. Place the top grill grate on the grill. Position the grill grate in a way that if you are using a hinged grill grate, one of the hinged areas lifts up over the coals so you can easily get to them.


4. Put the meat on the grill away from the coals. Lay the meat over the water pans as far away from the coals as possible. Under no circumstances should you let the meat rest directly over the coals. Cook in batches if you have to, and keep the finished meat in an oven set to “warm” while you do more.


Cover the grill, positioning the vent on the cover directly over the meat. This helps direct the smoke over the meat. Close all vents (bottom one, too!) to keep the temperature as low as you can go; if you have an especially tight lid, keep the vents open just a little. You are now barbecuing.
5. Watch the temperature. This would be a good time to open a beer or drink some lemonade and sit back. Keep one eye on the grill to make sure you see some smoke coming out of it. Wander over from time to time to check the temperature if your grill lid has a thermometer. It should read no higher than 325 degrees, preferably somewhere under 300. Ideally you want the temperature at the meat level around 225-250; heat rises and a lid thermometer will show the temperature at the lid, and not at the meat level. If your kettle grill does not have a thermometer built-in (most don't), put a meat thermometer into the cover vent and check it from time to time.
If your temperature starts to soar, open the lid and let the coals burn off a bit. Then add some more soaked wood and close the lid again; you should be OK.
If your temperature begins to drop below 225 degrees, open the vents. If that doesn’t get the temperature rising, open the lid and add more coals and soaked wood.
6. Check the coals and rotate the meat. Regardless of temperature, check your coals every hour to 90 minutes. You may need to add more. Always add more soaked wood at this point, and always turn or rotate your meat at this point, too.


7. Timing. How long should you cook things? Depends. Fish will take from 45 to 90 minutes. Chicken an hour to two hours. Baby back ribs, such as these, will take from 90 minutes to 2 hours and 15 minutes. A Boston butt, beef brisket or tri-tip can take as long as 6 hours.
If you are using a barbecue sauce – and with everything other than a Memphis-style dry rib you probably will be – wait to brush it on until the final 30-45 minutes of cooking. You do not want it to burn, and because most barbecue sauces have a lot of sugar in them, they will burn easily. When barbecuing fish, do not sauce until the last 15 minutes.

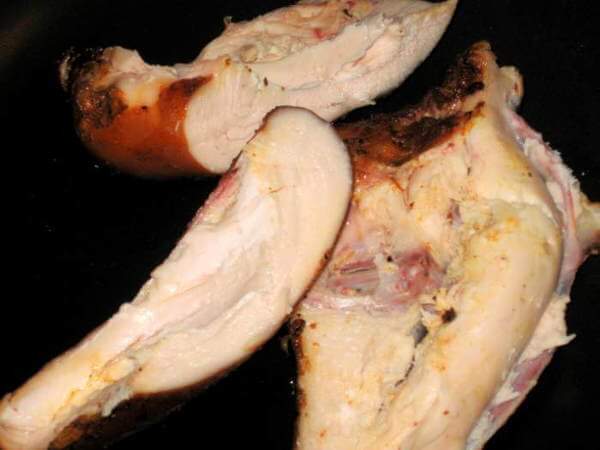
You will be able to spot doneness with some visual cues. Meat on bones will begin to pull away. When you turn or rotate meat it will begin to fall off the bone. The flakes on fish will separate easily. The interior of a Boston butt will be somewhere around 160 degrees – this is the only meat I barbecue with a meat thermometer.
What happens if your heat was just too high and things are looking charred? Well, hopefully you did not let it go this far because you’d been checking every hour to 90 minutes. But if it looks like you have too much char and the meat is not yet done, have no fear: Finish the meat in a 225-degree oven. You will still have enough smoky taste to impress your guests.
Once your meat is done, remove it to a platter, add more sauce and let it rest for 10-15 minutes. Let a big tri-tip or Boston butt rest for 20-25 minutes. Add even more sauce right at service and enjoy! You’ll know you cooked real barbecue if everyone has sauce under their fingernails…
Hello! All photos and content are copyright protected. Please do not use our photos without prior written permission. If you wish to republish this recipe, please rewrite the recipe in your own unique words and link back to How to Turn Your Kettle Grill into a Smoker on Simply Recipes. Thank you!
If you make this recipe, snap a pic and hashtag it #simplyrecipes — We love to see your creations on Instagram, Facebook, & Twitter!


A former restaurant cook and journalist, Hank Shaw is the author of three wild game cookbooks as well as the James Beard Award-winning wild foods website Hunter Angler Gardener Cook. His latest cookbook is Buck, Buck, Moose, a guide to working with venison. He hunts, fishes, forages and cooks near Sacramento, CA.

Showing 4 of 31 Comments
- Robert Pollina
I would suggest just one improvement on keeping the temperature steady. If you have a Weber like I use close the bottom vents to the width of a pencil. Set up your coals, pans and meat. Then when you put on the top only leave the top vents open by about an eighth of an inch and seal the top cover to the bottom of the grill by placing four medium bulldog clips (that you can easily steal from the office) clipping the top to the bottom. It really helps steady the amount of air and thus the temperature inside is much more stable. Also this hack looks very impressive and everyone asks about it so you will sound like you’re a step above your neighbor or crazy retired uncle.
i’ll add a couple of things …first, you can keep the top vent open all the time, and just regulate the temperature with the bottom vent. I put a large aluminum pan, half full of water, below the meat and two smaller aluminum loaf pans, each 3/4ths full above the fire. I use hardwood lump charcoal. You definitely do want that grate that folds open for adding more lit coals. I start out with a can of unlit charcoal, with a few wood chunks, and add a smaller amount of lit charcoal on top and let it burn. Without all 3 pans and water, my Weber kettle runs too hot …with the pans that i suggest, I can easily regulate the bottom vent to get 225-250 F. Note: spare ribs take a little longer …like closer to 4-1/2 to 5 hours. I run baby backs 3-1/2 hours, sometimes 4 hours. To check doneness, just try to pull 2 bones apart – if it’s done, the meat will easily split because it’s so tender.
- · 1 Reply
Of course you can get competition class que on a kettle smoker, or on a bullet smoker, or for that matter almost any smoker. It just is more difficult because ‘fire control’ is more difficult on these. On the competition circuit there are a number of teams that turn in respectable que on Weber kettles and bullet smokers.
One of the keys to good bbq is ‘low and slow’. The temperature in the cooking chamber should be in the 225 to 250 range, with light smoke and plenty of moisture. Any cooler and you risk growing nasty bacteria, any warmer and the meat will cook too fast – drying out and not having enough time for the cologen to break down to let the meat become tender.
I had been bitten by the bbq bug a number of years ago and have progressed through a number of smokers over the years. Each one presented its own challenges in maintaining an even, low temperature. And I had a ball learning the nuances of each one and how to cook good que on it.
Hmmm…. and with the Fourth a day away and with a bunch of chicken in the fridge, I wonder what I have planned for this weekend!
I do this often with my Weber grill but try to keep the heat down lower to between 200 and 225 for a real slow cooking. A boston butt should take about an hour to an hour fifteen per pound to get to an internal temp of about 200 F. All of the connective tissue falls apart once it hits 200F and you have to be careful lifting it out of the grill because it may fall apart. After 8 hours I will often take it off the grill and put it in a 200F oven to get those last few degrees to the magic internal temperature. That way I can use the grill to cook food for the non-pork eating friends of mine (not sure why I keep them as friends though)…
Great timing on the post! I’m a kettle user longing for a smoker and have done this in the past. There are two Weber accessories that I’d recommend for more smoke and for multiple slabs of ribs. Weber makes a rotisserie for the kettle which comes with a six inch extension ring effectively raising the dome lib by six inches and allowing the smoke to do it’s thing longer. obviously, one would remove the rotisserie part and just use the ring.
Weber’s rib rack is like a toast holder but for ribs and simply holds them up on edge allowing more slabs in there. Rotation is easy and it’s great with cornish hen to boot.
Thanks a ton for your blog!
You might also enjoy.
Recipe Categories
Main Ingredient
Special Diet
Season
Recipe Type


What's in Season?
Browse all of our December recipes.
Measurement Converter
Discover More
- Subscribe to new recipes for FREE!
- Follow Simply Recipes or get recipe updates on Twitter
- Press and Awards
Welcome to Simply Recipes

Thank you for stopping by! We love to share wholesome and delicious recipes, perfect for home cooked family meals.
Weber Grill & Smoker Parts
We carry replacement parts, repair parts and accessories for 227 Weber Grill & Smoker models
22" BLACK KETTLE CHARCOAL GRILL
SUMMIT 675, INSULATED SLEEVE
Homeowners rely on Weber grills and smokers to make outdoor barbecues special every time. From professional-level gas grills and charcoal kettle grills to porcelain-enameled smokers, Weber is the brand name for serious cooks who want reliable results whenever they heat up their outdoor cooking equipment.
Easy Start Functionality
When you don't want the hassle of fiddling with the fuel source, pick a Weber gas grill with an electronic ignition system. Light the main chamber with a push of a button, and easily light each burner individually using knobs on the front of the unit. If you ever have problems with the ignition contacts or need to replace a knob, Weber grill parts and accessories are easy to find, so you never have to worry about ignition system functionality.
Convenient Capacity Options
Choose the Weber grill that meets your cooking needs from multiple models that differ in size and capacity. Some models have as few as two and as many as six individual stainless steel burners. If you frequently entertain large groups of people, choose a Weber grill center model that comes equipped with a social area so the grill functions like an outdoor kitchen island.
Built-In Temperature Controls
When you want variety, add a Weber smoker to your equipment list. The company's smoker models come with built-in thermostats and aluminum dampers to control interior temperature, and most models come with a glass-reinforced nylon lid handle for safety. If any of these parts malfunction with frequent use, it's easy to find replacement smoker parts from Sears PartsDirect.
A Weber grill or smoker can last for many years with regular maintenance and occasional repair. Get the parts you need to keep your equipment in top working order at Sears PartsDirect. Just choose your model from the list above, click the chat button, or call 1-800-252-1698 for assistance.
Parts & More
We're available to chat FAQs
Check out the most frequently asked questions
fast shipping
Sears PartsDirect ships from regionally-located warehouses for timely delivery.
guaranteed fit
All parts are manufacturer-approved, to ensure proper fit and to keep appliances running for years to come.
for questions or assistance, call
888.873.3829 (Se Habla Español) (800) 660-7877
M-F 6:30 a.m. - 10:00 p.m. CT
Sat 7:00 a.m. - 9:00 p.m. CT
Sun 7:30 a.m. - 9:00 p.m. CT
Join our email list for updates and exclusive offers

for questions or assistance, call
M-F 6:30 a.m. - 10:00 p.m. CST
Sat 7:00 a.m. - 9:00 p.m. CST
Sun 7:30 a.m. - 9:00 p.m. CST
FREE Standard Shipping on orders of $ or more
Purchase requirement calculated before taxes and shipping charges and after other discounts have been applied and must be made in a single transaction. Cannot be applied to previous purchases and cannot be redeemed for cash. Valid for standard ground shipping within the continental United States and not valid for shipments to Alaska, Hawaii, Puerto Rico, Guam and the US Virgin Islands. Offer valid for online purchases only. In an event of a return, coupon savings may be deducted from your refund. Discount will be automatically applied during check-out. Sears Holdings reserves the right to terminate or modify this offer at any time for failure to comply with its terms and/or due to any operational malfunction of the software, hardware or equipment required to process this offer. © 2013 Sears Brands, LLC.
May not be used with any other coupon, associate discount, or during Family & Friends or Member events.
Chat is currently unavailable
We're sorry! All of our chat agents are currently assisting other customers. Please check back in a few minutes.
Or call now for immediate assistance: 1-800-252-1698
Thank you! Your model has been added.
Save model in your profile permanently
Don't have a profile? It's fast and easy to create one. Sign up now and you can access your models anytime, anywhere.
Save to this computer*
This option is valuable if you expect to revisit Sears PartsDirect using this computer and browser in the future.
*Saved models will only persist on this computer and browser. Model retention may be affected by your browser settings.
Weber Grill & Smoker Parts
We carry replacement parts, repair parts and accessories for 227 Weber Grill & Smoker models
PLATINUM II 3400LP, OUTDOOR GRILL
SUMMIT 625 NG, OUTDOOR GRILL
PLATINUM II 2200 LP,OUTDOOR GRILL
PLATINUM II 2200NG, OUTDOOR GRILL
SUMMIT 450 LP, OUTDOOR GRILL
SUMMIT 6 BURNER GAS ROTISSERIE
PLATINUM LP, SIDEBURNER
18" BAR-B-KETTLE GRILL
PLATINUM II 3400LP, OUTDOOR GRILL
SUMMIT 425 NG, OUTDOOR GRILL
PLATINUM LP, SIDEBURNER
SUMMIT 4 BURNER GAS ROTISSERIE
SUMMIT 450 LP, OUTDOOR GRILL
SUMMIT 625 NG, OUTDOOR GRILL
SUMMIT CART-MOUNT SIDEBURNER, NG
PLATINUM II 2200 LP,OUTDOOR GRILL
SUMMIT 425 LP, OUTDOOR GRILL
PLATINUM II 2200NG, OUTDOOR GRILL
SUMMIT CART-MOUNT SIDE BURNER,LP
SUMMIT 650 NG, OUTDOOR GRILL
PLATINUM II 3400NG, OUTDOOR GRILL
SUMMIT 425 NG, OUTDOOR GRILL
SUMMIT 425 LP, OUTDOOR GRILL
SUMMIT 425 LP, OUTDOOR GRILL
PLATINUM II 3200NG, OUTDOOR GRILL
SUMMIT 450 LP, OUTDOOR GRILL
SUMMIT 675 COOK MODULE
PLATINUM II 2200NG, OUTDOOR GRILL
SUMMIT 4 BURNER GAS ROTISSERIE
PLATINUM II 2200NG, OUTDOOR GRILL
PLATINUM II 3200NG, OUTDOOR GRILL
PLATINUM II 2200 LP,OUTDOOR GRILL
SUMMIT 675, INSULATED SLEEVE
SUMMIT 675 COOK MODULE
SUMMIT 625 NG, OUTDOOR GRILL
PLATINUM II 3200NG, OUTDOOR GRILL
PLATINUM II 3400NG, OUTDOOR GRILL
SUMMIT 450 NG, OUTDOOR GRILL
PLATINUM II 3400NG, OUTDOOR GRILL
SUMMIT 675 COOK MODULE
SUMMIT 450 LP, OUTDOOR GRILL
SUMMIT 625 NG, OUTDOOR GRILL
SUMMIT 475NG, COOK MODULE
SUMMIT CART-MOUNT SIDEBURNER, NG
PLATINUM II 3400NG, OUTDOOR GRILL
Homeowners rely on Weber grills and smokers to make outdoor barbecues special every time. From professional-level gas grills and charcoal kettle grills to porcelain-enameled smokers, Weber is the brand name for serious cooks who want reliable results whenever they heat up their outdoor cooking equipment.
Easy Start Functionality
When you don't want the hassle of fiddling with the fuel source, pick a Weber gas grill with an electronic ignition system. Light the main chamber with a push of a button, and easily light each burner individually using knobs on the front of the unit. If you ever have problems with the ignition contacts or need to replace a knob, Weber grill parts and accessories are easy to find, so you never have to worry about ignition system functionality.
Convenient Capacity Options
Choose the Weber grill that meets your cooking needs from multiple models that differ in size and capacity. Some models have as few as two and as many as six individual stainless steel burners. If you frequently entertain large groups of people, choose a Weber grill center model that comes equipped with a social area so the grill functions like an outdoor kitchen island.
Built-In Temperature Controls
When you want variety, add a Weber smoker to your equipment list. The company's smoker models come with built-in thermostats and aluminum dampers to control interior temperature, and most models come with a glass-reinforced nylon lid handle for safety. If any of these parts malfunction with frequent use, it's easy to find replacement smoker parts from Sears PartsDirect.
A Weber grill or smoker can last for many years with regular maintenance and occasional repair. Get the parts you need to keep your equipment in top working order at Sears PartsDirect. Just choose your model from the list above, click the chat button, or call 1-800-252-1698 for assistance.
Parts & More
We're available to chat FAQs
Check out the most frequently asked questions
fast shipping
Sears PartsDirect ships from regionally-located warehouses for timely delivery.
guaranteed fit
All parts are manufacturer-approved, to ensure proper fit and to keep appliances running for years to come.
for questions or assistance, call
888.873.3829 (Se Habla Español) (800) 660-7877
M-F 6:30 a.m. - 10:00 p.m. CT
Sat 7:00 a.m. - 9:00 p.m. CT
Sun 7:30 a.m. - 9:00 p.m. CT
Join our email list for updates and exclusive offers
for questions or assistance, call
M-F 6:30 a.m. - 10:00 p.m. CST
Sat 7:00 a.m. - 9:00 p.m. CST
Sun 7:30 a.m. - 9:00 p.m. CST
FREE Standard Shipping on orders of $ or more
Purchase requirement calculated before taxes and shipping charges and after other discounts have been applied and must be made in a single transaction. Cannot be applied to previous purchases and cannot be redeemed for cash. Valid for standard ground shipping within the continental United States and not valid for shipments to Alaska, Hawaii, Puerto Rico, Guam and the US Virgin Islands. Offer valid for online purchases only. In an event of a return, coupon savings may be deducted from your refund. Discount will be automatically applied during check-out. Sears Holdings reserves the right to terminate or modify this offer at any time for failure to comply with its terms and/or due to any operational malfunction of the software, hardware or equipment required to process this offer. © 2013 Sears Brands, LLC.
May not be used with any other coupon, associate discount, or during Family & Friends or Member events.
Chat is currently unavailable
We're sorry! All of our chat agents are currently assisting other customers. Please check back in a few minutes.
Or call now for immediate assistance: 1-800-252-1698
Thank you! Your model has been added.
Save model in your profile permanently
Don't have a profile? It's fast and easy to create one. Sign up now and you can access your models anytime, anywhere.
Save to this computer*
This option is valuable if you expect to revisit Sears PartsDirect using this computer and browser in the future.
*Saved models will only persist on this computer and browser. Model retention may be affected by your browser settings.
Weber grill smoker
Our experts are grilling delicious food on authentic Weber Charcoal Kettles.
Our Restaurant
The Weber Grill Restaurant is the result of over 60 years of Classic Outdoor Grilling—from the people who invented the Weber Charcoal kettle grill. You‘ll taste the difference that decades of grilling expertise make. More than a steakhouse & BBQ, our chefs are the grilling experts for seafood and vegetable specials as well. Our secret: a commitment to using quality ingredients, innovative recipes, honed grilling technique, and Weber charcoal kettles. We are especially proud of our Hand-Cut Black Angus Steaks, Wood-Smoked Barbecue, Fire-Inspired Seasonal Entrees, Charcoal Seared Burgers and Fresh Grilled Seafood.
Weber Grill Smoking In Your Charcoal Kettle Grill
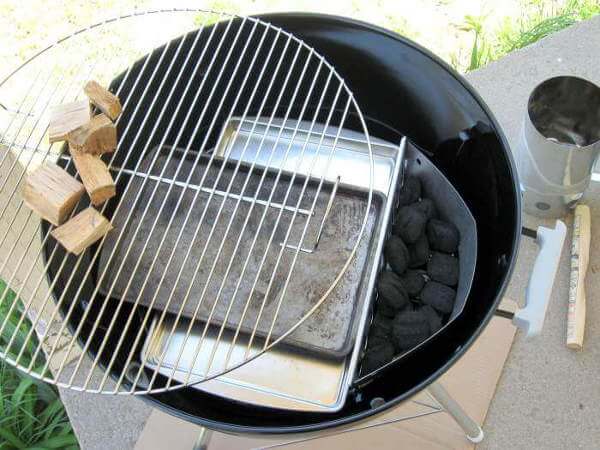
Get your Weber grill smoking chicken, ribs or brisket by using this easy method. It can be done using no special equipment, however there's one item that makes smoking in your Weber a lot easier.
That's the Weber Char-Basket charcoal briquet holders . They come as a pair, and are designed to contain the charcoal into two separate piles, one on each side of your Weber kettle grill. I often use just one of them when I want to cook down around 225 degrees Fahrenheit. When using the pair, the temperature runs higher.
In the picture above, there are a few fresh unburned briquettes on top of the charcoal in the basket. This is for demonstration purposes only. For best results add hot burning briquettes to the basket each hour. Five to eight per hour is typical, but you may need more depending on the outdoors temperature.
Weber Grill Smoking - The Method, Step by Step
The main points to remember when smoking in a Weber kettle grill are
- Monitor the temperature through the lid vent

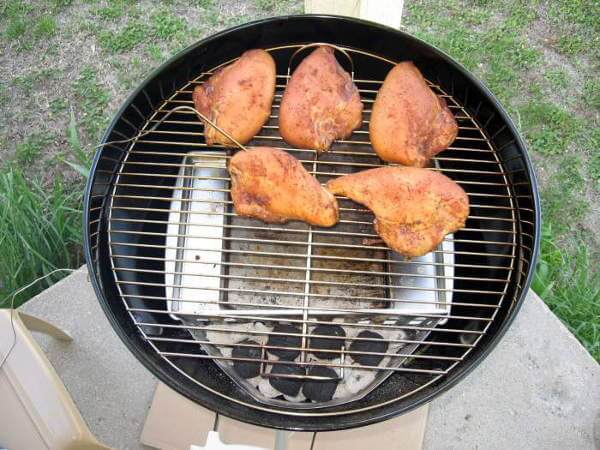
Gorgeous Grill Smoked Chicken Breasts, Nice and Juicy!
And it looks like whole chicken breasts are what's cooking today! In this picture you can see that the even though chicken has been cooking for a good long hour, not much juice has dripped out. That's due to a combination of brining the chicken, allowing it to surface-dry before placing it on the grill, and cooking at a low smoking temperature.
When smoking in your Weber kettle grill , be sure to monitor the temperature of the chicken breasts and the cooking chamber regularly.
Shop Internationally at Sears
Planning a visit to the United States?
Or have friends and family in the U.S.?
Shop at Sears to get everything you want—including great gifts for yourself or others.
You'll be happy to see how online shopping in the U.S. couldn't be easier. Simply use an international credit card.
Free U.S. Store Pickup
Order something online but need a little help picking it up? No problem. You (or someone you know) can pay and pick up online orders at a Sears store.
U.S. Shipping & Delivery
Looking to keep it simple? Get your order shipped or delivered to any address in the United States—including hotels. Get a little help from friends and family to get what you want—simply have your order delivered right to them.
Did you know Sears ships to over 100 countries? Take advantage of this major convenience and get whatever you wish, shipped to wherever you want.
Shop in Puerto Rico
Now it's easier than ever to shop at Sears in Puerto Rico and the Caribbean.
Whether you're living there or just visiting, you can pick up your order or have it shipped to you.
Sears International Online Shopping
Learning Center
Recently Viewed Items
I have been ordering from BBQ Guys around 5 years - they have consistently provided wonderful service and the people on the phones have always been warm, friendly and patient - I mostly order online but every now and then you need a live person and these folks are the best - totally 5 STARS!
Stewart E. 2016-01
We have been working with BBQ Guys to finish our new outdoor kitchen. Seda did great work explaining everything to us and helping us select just the right equipment at just the right price. He is a real credit to your business.
I ordered an outdoor refrigerator and a Primo XL cooker from the BBQGuys online store. The prices were very competitive. I was pleased with the communications and prompt processing of the order. Both arrived via freight carrier. The firebox on the Primo cooker was broken. The customer service was great and the firebox was replaced quickly. I highly recommend BBQGuys. I will be shopping with them again.
Completely happy with the products I have purchased through BBQGuys. While one of the appliances I ordered did stop working within a years time Kimberly in customer care took control of my issue in a prompt, friendly and professional manner replacing the appliance without any frustration or hardship on my part. Easy and actually painless as my expectation was, when I started the process, that I was going to be in for a long drawn out ordeal. With the quality of products they sell and the customer care they offer I will always make BBQGuys my number one choice of outdoor kitchen appliances.
Patricia D. 2016-01
I would highly recommend using BBGuys.com to purchase a bbq. Dominic was very helpful in finding the right size grill to fit my needs. He was great in keeping in touch with me through the process. I would recommend calling if you have any questions as Dominic assisted me through the entire process.
Raymond BBQ 2015-12
Company Info
- Get To Know Us!
- Customer Testimonials
- Corporate Culture
- Working At Our Company
- Family Of Brands
- Partner With Us
- Become A Vendor
- Corporate Info
- ShoppersChoice.com's
Customer Care
Programs & Services
Call Toll-Free
Click to Call Us
Or call us directly at 1-877-723-8113 Mon-Fri 7-9, Sat 8:30-5, Sun 9:30-6 CST
Have Any Questions?
One of our Customer Service Representatives can help.
Get Expert Grilling Advice & Special Offers
Follow BBQGuys.com
Like BBQ Guys on Facebook
+1 BBQ Guys on Google+
Follow ShoppersChoice.com on Twitter
Follow BBQ Guys on Pinterest
Visit BBQ Guys's Instagram
Visit BBQ Guys's YouTube channel
- Copyright © 2017 BBQ Guys is owned and
Welcome to the ShoppersChoice.com Family!
You are now subscribed to receive our newsletters and special offers straight to your inbox at the email address you provided, . You will receive an email with instructions to edit and update your subscription preferences.
Weber Summit Charcoal Grill
Weber-Stephen
Weber-Stephen is one of the oldest and most respected manufacturers of BBQ equipment and related accessories in the world. Weber grills and smokers cook beautifully and have great features that are clever, effective and easy to use. As popularity and demand for BBQ gear grows worldwide, Weber continues to earn their long standing reputation for quality, durability and outstanding customer service and support, (7 days a week from 7am to 9pm CST), in an increasingly competitive environment. Even in this crowded marketplace, many consumers are still willing to pay more for the Weber name and they are rarely disappointed. They make a variety of cookers and smokers. Their iconic black charcoal kettles are known throughout the world. Indeed Weber is expanding globally.
Weber-Stephen was family owned since it was founded in 1952 by George Stephen. At the end of 2010 the Stephen family sold a majority stake to Chicago investment group BDT Capital Partners. In 2012, Weber settled a class action suit out of court regarding their use of the phrase, "Made in USA". Weber previously qualified the "Made in USA" statement by specifying their products are assembled in the USA with some components that are sourced globally. Here is an excerpt from Weber's statement "Weber believes that because all Weber grills and the disputed accessories are designed and engineered in the USA, and all grills save for one line [Spirit]* are manufactured and assembled in the USA using component parts primarily made in the USA, it did nothing wrong and therefore has valid defenses to plaintiff's claims. The court has not held a trial or ruled in favor of either party on any disputed issues. Weber and the plaintiff have agreed to settle the matter to avoid the costs of continued litigation." As a result of this suit, Weber can no longer claim to be made in America.
Things change, but we believe Weber's commitment to quality and innovation has not.
The biggest barrier for many folks is price. Webers are not cheap, but when you consider that they last decades, the price is easy to justify. In fact, when you consider the fact that some cheap grills fall apart after three years or so, Webers might be considered a bargain.
Our main complaint: All Webers have the obligatory bi-metal dial thermometer in the hood that gives you a ballpark reading of what the temperature is high above the meat. Since we cook on the grates, though, it's always better to bring your own digital thermometer and place a probe there. It would be nice if they would go digital in the digital age and it appears with their acquisition of iGrill digital thermometers, this is begining to change.
*At the very end of 2016 Weber introduced their new line of Genesis II gas grills to replace the popular Genesis series. Genesis II is made in China. Genesis II LX is still made in Palatine, IL.
Weber Charcoal Grills
In 2015 Weber changed the names of several popular charcoal grills and added a few new features. Don't worry though, they are still the iconic kettles you grew up with. These classic grills have played a big part in BBQ history and helped spread the joy of outdoor cooking across America and beyond. The 22.5" kettle is by far the most popular backyard grill in the world for under a hundred dollars. The body and lid are pressed from solid sheets of steel so there are no welds to rust, and coated with a durable powder coated baked on porcelain enamel that lasts for decades. The lower intake vents double as an ash collection system and the three legs with two wheels make rolling it around a snap. It is lightweight, there are few parts, and simplicity reigns. The lids fit tightly so oxygen control, and therefore heat control, is very good. And, with the exception of the Ranch Kettle, they are inexpensive.
AmazingRibs.com science advisor, Dr. Greg Blonder, observes, "Most people believe the Weber is a parabolic reflector, focusing heat emitted by the coals directly on the grill. A parabolic reflector is only effective when the heat source is tiny, intense and located at the focal point. This is not true in the case of the Weber, where the heat source is a sheet of coals spread over a large area. On the other hand, the Weber gets many things right. While the parabola won't create a beam of infra-red energy, the high almost vertical side walls reflect the infra-red image of the coals from side to side- like images of your head pinging back and forth between two mirrors at the barbershop. So this 'reflection gallery effect' does increase the heat intensity a bit compared to cooking over an open pit, where heat emitted to the sides is lost. The system is efficient, burning a minimum number of briquets during cooking." Probably no other single invention has influenced the American diet more since the invention of the electric refrigerator.
Weber Charcoal Grills are offered in four basic configurations: the small, portable Smokey Joe Series, the larger One-Touch kettles on three legs, the Performer Series mounted on carts and the oversize Ranch Kettle. They also offer three models of the popular Weber Smokey Mountain smokers. In 2016 they introduced Weber Summit Charcoal Grills, multifunction cookers that are effective smokers and grills under one hood.
Gold Medal


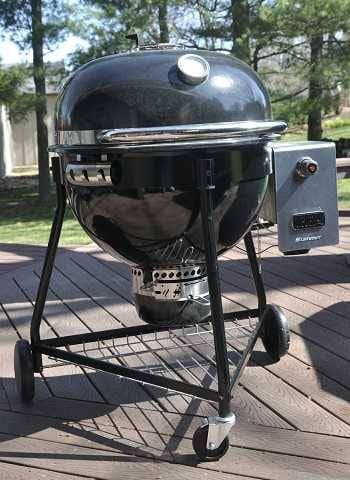
Introduced on 4/6/2016, the Weber Summit Charcoal Grill is a radical departure from George Stephen's original Weber Kettle and Weber's first major upgrade to the kettle in decades. It is bigger, badder and more versatile with a price tag to match. Aimed squarely at people who are serious about both grilling and smoking and priced to compete with high end charcoal grills, it carries the Summit name that adorns their top of the line gas grills. It is at once a superb high temp searing grill even better than the original kettle, and an effective dedicated low and slow indirect heat smoker reminiscent of a kamado. So is it a kamettle? Kettlelado? Here it is beside the classic 22" Weber Kettle.

There are two models with the same kettles in different carts. Our test model, provided by Weber, was the "Summit Charcoal Grill", mounted on a sturdy three legged stand with two large plastic wheels and one locking caster. A triangular storage shelf rests at the bottom. MSRP is $1699, but most sellers will go with the Minimum Advertised Price of $1,499, comparable to a Big Green Egg XL kamado with a stand and diffuser plate at over $1,500 list. The "Summit Charcoal Grilling Center" has a large cart on the side with a stainless steel work surface, a lower shelf, a slide out basket, a coal storage bin, on top of two large plastic wheels and two locking casters. Here again the MSRP is $2299, but street price is $1,999, comparable to a BGE with a cart. Here is a video of our test unit and a picture of the cart version.

Summit Charcoal Grills are double walled and air insulated. Many kamados are heavy ceramic ovens with thick walls that hold temps steady for long durations, a blessing if you nail the desired temp, a curse if you overshoot because they take forever to cool down. With air insulation between the outer and inner walls, Summits hold temps well yet they can switch gears much faster than ceramic or fiberglass insulated kamados, providing both agility and forgiveness when temperature changes are necessary.
Summit's outer body is Weber's signature black porcelain-enameled coated steel that has proven it's durability for more than 60 years. The lining of the lower bowl is also black porcelain-enameled steel. It terminates, open-ended, at the lower coal grate position allowing hot air to be trapped between the outer and inner walls. The inner wall of the lid is aluminum and there is also an air gap between it and the outer wall. Though considerably lighter than a ceramic dome, Summit still employs a heavy duty spring assisted hinge making it easy to open and leave open. A gasket made of thin stainless steel thread woven into a braid runs along the lip and seals the top and bottom halves.
One new feature that really got us stoked is the movable charcoal grate. It can sit at the bottom directly above the air intake dampers for medium temperature cooking, or be raised to four inches below the cook surface for hot grilling. With a couple of layers of briquets, you can have scorching infrared heat within 2" or less of your steak. We've long wished for Weber to provide a way of bringing the coal closer to the cook surface for improved searing. This design, coupled with the hinged stainless steel cooking grate allows you to easily add more charcoal and features "Weber's Original Gourmet Barbecue System" which has a removable round center that can be replaced with various inserts like a pizza stone, griddle or wok. Click here to learn why we love thin stainless steel rod grates better than any other, even cast iron. For those who prefer a standard 24" stainless grate, Click here to check out the Big Green Egg 24" Stainless Steel Cooking Grid.


A slick "Rapidfire" damper crests the dome. It functions like a standard Weber disc-shaped damper but it is on a hinge and can be flipped up and out of the way for maximum exhaust to increase temps rapidly in conjunction with the lower vents. When we first fired up Summit the damper was stiff and was difficult to spin, but after three or four cooks, it worked perfectly. Weber said they had not encountered this issue on their test units, and indeed, previous to receiving our test model, we cooked on Summits at the Weber Grill Academy and they worked fine.

Both models include a piezo electric "Snap-Jet Gas Ignition System" that runs off a 16 oz. propane cylinder to start your charcoal with a gas flame. The gas ignition burner is located just beneath the lower charcoal grate. It can be used to start coal with the grate in either the upper or lower position, but burn times are slightly different: 7 to 10 minutes lower grate position, 12 to 14 minutes upper grate position. You always leave the lid up during ignition. After turning off the burner, you close the lid and pre-heat.

Packaging was excellent. One learns a great deal about a cooker during assembly. The elegant design and quality construction of the Summit Charcoal Grill was evident at every step. Warranty is 10 years on the bowl and lid (no rust though/burn through), 5 years on stainless steel cooking grate and One-Touch System (no rust though/burn through), 5 years for plastic components and 2 years on all remaining parts.
Grilling with the charcoal grate in the upper position is very similar to grilling on a standard Weber 22" kettle, only a lot hotter because the charcoal is much closer to the food. Grilling with the charcoal in the lower position is more like the 22" kettle. The 24" wide cooking surface provides a surprising increase in capacity, and makes 2-zone setup really easy. We consider 2-zone cooking a crucial technique for outdoor cooking and it is our biggest complaint about most round kamados. Because their cooking surface is smaller and the charcoal is farther from the food, they are not well suited to this method.
Because the coals are so close to the meat you need to make sure they are distributed evenly, and if some coals are burning red hot while others are just getting started - you got hot spots. We made this mistake when testing it with chicken wings and as a result had to move them around a little to get even cooking and crisping.
But we were in for a real treat when it came time to reverse sear 2" thick steaks. Click here to learn about Reverse Searing Steak and 2-Zone Cooking. With the coal grate up high, we piled two scoops of charcoal on one side for hot direct radiant heat and left the opposite side empty for a warm indirect zone. We slowly cooked our thick steaks to about 110°F internal temp over indirect heat, then seared the snot out of them over the charcoals, flipping often to create an even dark brown crust. As eagerly anticipated, the red hot coals just 2 to 3" inches beneath the meat browned the steaks beautifully.

Kamado cookers typically use a ceramic disc between the charcoal and the cook surface to block direct radiant heat and even out temps for low and slow cooking, especially smoking. Weber reimagines the diffuser as a double walled hinged stainless steel disc. The hinged sides allow easy access to tend the fire and add charcoal.

Weber wants to ensure success right out of the box for new owners so the manual offers detailed instructions for direct heat grilling, indirect heat grilling, and smoking. It provides a "Charcoal Quantity for Smoking & Cooking Times" chart that lists instructions for various types and weights of meat. They give, "guidelines rather than hard and fast rules". We prepared a pork butt and, referencing the manual, set our sights for 8 to 12 hours of smoking with 2.75 cups of charcoal and 5 wood chunks. After running the ignition burner for 7 minutes we scattered the charcoal, tossed on the wood, installed the diffusion plate, positioned a water pan in the center of the plate, filled it with boiling hot water, installed the grate and placed a digital thermometer probe off center next to the meat. We closed the lid with the Rapidfire damper down and the intake vents open all the way. Following instructions, when the needle hit the 225°F to 275°F range we moved the intake vent to the "Smoke" setting. For the upper damper the manual instructs, "rotate the Rapidfire lid damper accordingly to maintain recommended smoke temperature." We took a chance at setting it halfway open. Within 20 minutes the temp climbed to 300°F on our probe. After some fiddling around, we decided to treat Summit like a kamado and shut both dampers down considerably. This is tricky with the lower damper as you can't see the vent openings, so it's a good idea to familiarize yourself with how far you can go without shutting it off completely. We settled on positioning it slightly to the left of the smoke mark. The upper damper ended up open about one third.
The temp never got out of control, but it was difficult to nail our desired target of 225°F without more practice. Summit seemed comfortable running in the 250° range. The medium size butt was done at 10 hours. After removing, we took a peek at the fuel. Surprisingly, there was nothing left but crumbs, yet the temp had not dropped. The duration fell within Weber's projection of 8 to 12 hours and, had we started with lower temps, it might have gone longer. The pork was delicious, very moist with beautiful bark.

Armed with this knowledge we went for a second round with no meat. This time we chose the maximum charted duration of 12 to 18 hours using 3.25 cups of coal. After closing the lid, we closely watched the built-in thermometer. As soon as it hit the low smoke range of 225°, we moved the lower arm just left of the smoke mark, and set the upper damper to one third open. It ran a little hot, at one point reaching 260°. After another stretch of trying to finesse damper settings, we went back to the beginning: lower vents set just left of the smoke mark, (see left), and upper at one third. The temp settled in at 245° and stayed steady. Before trying this, know your bottom vents. If you go too far to the left of the smoke mark, you'll shut off air intake and temperature will plummet. Without replenishing coal, Summit ran for about 13 hours.
Obviously, if one adds more coal, the duration will increase. Since Weber provides easy access to the fire via hinged cooking grate and diffuser plate, we got up early the following day for one more test with a scheduled fuel stop. Once again we used 3.25 cups of coal, burned the ignitor for 7 minutes, then went off script from Weber's directions and shut the lower vents down to just left of the smoke mark and upper vent one third open. Just like with a kamado, we let the temp come up slowly into Weber's smoke range. Temp was more moderate and settled at around 235°. Several hours into the test we used One-Touch to clear the ash, and then flipped up the grate and diffuser to add a couple handfuls of coal to each side. At some point after refueling, temps started to climb and we had to shut down the top vent to a sliver. Ultimately it ran about 15 hours, long enough for a brisket with a long stall. In the graph below you can see it is pretty steady with minor fluctuations due to fiddling with the vents and refueling. With practice I am sure we can even out the bumps. Pretty impressive.

Other experiments await exploration, such as using firestarters instead of the gas ignitor to create a smaller initial fire. And Weber provides a built in port for thermostat temperature controllers like the popular BBQ Guru. Thermostat controllers become your smoke babysitter for long cooks, and are especially useful for ones that go overnight. You place a probe near the meat and close all the air intakes except one. The probe talks to a fan that goes over the open vent which turns on and off regulating the oxygen supply to the coals. They control the temp very effectively. Click here to check out our Temp Controller Reviews.
Although prices are in line with Summit gassers and premium quality kamados on carts, they're a big leap up from the kettles we know and love. Many who already smoke and grill on their kettles will shrug and wonder why spend more. At the end of the day, it's true that a regular classic Weber kettle can grill and smoke, but the new Summits are just plain bigger and better in every way. You get more capacity, ease of use and more versatility. It actually is a dedicated charcoal smoker by design, and we love the adjustable coal grate that burns directly under the cook surface for better searing. No doubt these new Charcoal Summits will shake up the backyard cooker market and you can bet kamado makers are winding up their counter punches.
Unlike Summit gassers, these new coal burners will not be sold in big box hardware stores. At least for now Summit Charcoals are only available through indy dealers. As mentioned above, MSRP is $1699, but street price is $1499. Scroll down for our Where To Buy Section to get yours.
Cooked On It
We have hands-on experience testing this product. We have also gathered info from the manufacturer, owners and other reliable sources.
Please read this before posting a comment or question

1) Please try the table of contents or the search box at the top of every page before you cry for help.
2) Try to post your question to the appropriate page.
3) Tell us everything we need to know to help such as the type of cooker and thermometer. Dial thermometers are often off by as much as 50°F so if you are not using a good digital thermometer we probably can't help you with time and temp questions. Please read this article about thermometers.
4) If you are a member of the Pitmaster Club, your comments login is probably different.
8 Easy Options for Smoking on a Weber Kettle
Update April 10, 2016 – We’re adding Slow’n Sear. The Slow’n Sear just outright spanks the Smokenator. We’ll leave the Smokenator listed for now.
We all already know that the Weber Charcoal Kettle is the ULTIMATE grilling machine. It grills, it bakes, it roasts – and it even smokes (true barbecue). While the standard Weber charcoal grill is often the gateway cooker for hardcore BBQ guys, with a little tweaking and practice it can churn out amazing BBQ just like the thousand dollar Jambos and other high quality smokers.

Forum member Bob Hope shows off a brisket smoked on his Weber Kettle using banked coals.
Ready to start doing some barbecue and smoking on your kettle? Here are your options:
Free & Cheap Options for smoking on your Weber Grill
There’s no REAL reason to spend any money on gadgets and bbq mods. Here are the free and cheap ways to smoke on your Weber kettle.
1. Bank & Smoke:
Simply bank a dozen or so coals on one side of your grill and keep your meat on the opposite side of the grill. Use a wood chunk or two to get that true barbecue flavor. Add fresh, unlit charcoal every hour or so. Start with 12 unlit briquettes and add 4 lit and a wood chunk on top. Put your meat on when the smoke is a nice thin blue.
Pros: no investment, relatively effective
Cons: small cooking area, no separator between heat source and food, have to open lid often to add fuel
2. Charcoal Baskets
The Weber Charcoal Baskets are freaking awesome. Not only are they incredibly handy for grilling and lighting charcoal (especially on a Performer with gas assist) – but they’re great for smoking on your grill. Just slide one of the baskets to the side of the grill, fill it with unlit charcoal, and add 5 or 6 lit briquettes to it. Toss a wood chunk on top of it all and you’re ready to barbecue!
Pros: Baskets aren’t uni-taskers. They’re great for grilling. Some members even use them to raise the grates for grilling pizza.
Cons: You’ll still be adding fuel every couple hours or more. No heat shield. Small cooking area.

Hogsy shows off his fire brick smoking method
3. Bank + Bricks:
This is a slight upgrade to the banked coal smoke method of smoking- build a wall with a couple bricks. This wall will contain your lit and unlit fuel – as well as your smoke wood. Compared to banking the charcoal and baskets, this will hold MORE unlit charcoal, which means you’ll be adding fresh unlit charcoal less often. To be safe, you should use fire bricks – although dozens of members have used regular red bricks without issue. I know people have have been smoking on their grill like this for decades.
Cost: Less than $10 (more if you use fire bricks)
Pros: Holds more fuel than simply banking coals, bricks provide heatsink for more indirect cooking and temperature maintenance
Cons: small cooking area, still not much separation between heat and food, have to open lid to add fuel

Cookingmama demonstrates how to smoke on a Weber with the snake method
4. Fuse / Snake Method:
This is a fun one, and one of my personal favorites. Create a long fuse of unlit charcoal around the outside of your grill. Make the fuse/snake 2 or 3 briquette layers deep. Put your smaller wood chunks directly on top of the unlit charcoal snake. Start the smoke by adding 4 or 5 lit and ashed over charcoal briquettes to one end of your fuse. Place your meat directly in the middle of the C or U snake. This works better for butts and shoulders than it does for ribs.
Pros: longer cook time before adding fuel, easy to see how much lit fuel you have. With a little practice, this is a set up that will allow you to walk away for several hours.
Cons: small cooking area, very little separation between food and heat, adding fuel is more tedious than banked methods (assuming you have a hinged grate)
Less than $100

Smoking a turkey on a Weber grill with a smokenator
5. The Smokenator
For 60 bucks plus shipping you can pick up a Smokenator. It’s a metal baffle that dedicates about 6″ of space for charcoal and wood, leaving the rest of the charcoal grate wide open for food. It comes with a small water pan and a dedicated cutout for it. The big advantage of the smokenator is that it allows you to use a portion of the charcoal grate as a cooking space. The stainless steel serves as a heat barrier to reduce the direct cooking effect. I would personally skip the water pan and use that space for more fuel.
Cost: $60 on Amazon
Pros: makes cooking on charcoal grate easy, can still cook on half of cooking grate, there’s a layer of steel separating the heat from the meat, holds more fuel than most brick configurations. It also comes in an 18″ version and a 26″ version.
Cons: Water pan is tiny and mostly innefective. still can’t use full cooking grate, have to open lid to add fuel.
6. The Slow ‘N’ Sear

The Slow’n Sear – Makes smoking and grilling easier and more fun.
The Slow’n Sear popped on the scene last summer and has effectively curb-stomped the Smokenator. The Slow’n Sear holds more water than the Smokenator. It’s super easy to use. It holds temps for 8-10 hours without issue. It is useful for smoking, indirect grilling, and even direct high heat grilling. It is, quite literally, an accessory that can always stay inside your Weber kettle grill. It’s especially useful for vintage Weber grill users because it acts as a heat shield, which will help prevent damaging the porcelain on those vintage colors. You can pick up the Slow’n Sear from Amazon for $90 shipped. It’s 5lb of stainless steel, and its USA made. You can also read the full Slow’n Sear review
Less than $200
I personally think the $150 mark is the sweet spot.

Smoking a full load of ribs and chicken on the Cajun Bandit Stacker
7. Cajun Bandit Stacker
At $160 shipped, the Cajun Bandit Stacker is a high quality stainless steel ring fits PERFECTLY on your 22″ Weber Charcoal Grill. It raises the cooking grate up about 12 inches and allows you to use the whole cooking grate for food as well as the whole charcoal grate for fuel. This means you can cook a few pork butts, or several racks of ribs without having to roll your ribs or reload your fuel. The charcoal ring and heat diffuser is certainly worth the $20 upgrade – unless you have a nearby restaurant supply store, in which case just go buy a 20″ pizza pan to use as the heat diffuser. Another advantage with the Cajun Bandit Stacker is that it will ALSO fit your Weber Smokey Mountain Cooker or Cajun Bandit Conversion Kit if you ever invest in either.
With the stacker, you can get about 20 hours of low and slow without adding fuel.
Cost: $160 shipped
Pros: can load a LOT of fuel, can utilize full cooking grate, has metal heat shield to separate heat from meat
Cons: if you have to add fuel, you have to remove the whole stacker. Heat shield is a bit flimsy. No water pan. Heat shield doesn’t contain a lot of drippings, so you may need to improvise if cooking more than one pork butt.

Smoke-ez: Smoking ribs on a Weber grill
The Smoke EZ is an option similar to the Cajun Bandit Stacker. It’s another tube style barbecue extension for smoking on the Weber kettle. The Smoke EZ has some cool perks, like nice wooden handles and an included smoker hanging rack for hanging sausages or fish instead of (or in addition to) using the grate. The Smoke EZ has a version that will fit the 26″ Weber too – something Cajun Bandit hasn’t launched yet.
Pros: Can load a lot of fuel. Can utilize full cooking grate. Includes water pan and charcoal ring. Can also hang sausage, etc
Cons: Charcoal ring and water pan are smaller than expected.
DISCONTINUED 🙁
Cajun Bandit Weber Smoker Conversion Kit

The Cajun Bandit Conversion kit converts your Weber Grill into a smoker. This beautiful red smoker belongs to Swamprb.
Now you’re in the big leagues – this kit will convert your Weber Kettle into a smoker very similar to the Weber Smokey Mountain cooker / smoker. The Cajun Bandit – from the same company that produces the BBQ Stacker – is a full conversion kit. This the ultimate solution. It comes with a leg conversion kit to lower the bowl, a giant water pan, and a 2nd cooking grate. A Weber grill converted into a smoker with the Cajun Bandit actually has some advantages over the Weber Smokey Mountain – namely, it will still easily serve as a grill, and the hinged stainless door knocks the socks off the WSM crappy door.
The Cajun Bandit conversion will turn your Weber Kettle into a hardcore professional level smoker. There are KCBS BBQ champions using these units. A cajun bandit smoker will hold 6 giant pork butts and cook all of them evenly. I’ve cook 18 full slabs of pork ribs on my bandit and all of them cooked evenly. This is the real deal. It’s well made and fits the Weber kettle like a glove. Shipping will set you back about 40 bucks – but you’ll have no regrets with this smoker conversion.
PROS: Well made, fits perfectly together, holds a lot of meat, a lot of fuel, flexible and versatile
CONS: While you don’t HAVE to use the legs, you should – and that involves drilling into your kettle.
Sorry folks, the full Cajun Bandit conversion kit is no longer being made. 🙁
Awesome write-up Troy!!
I will share this with a few of my co-workers tomorrow. They have kettles but look at me like I am from the moon when I talk about the WKC!
This is a great write up! I’m going to add a link to it from my blog so that folks don’t have to think that they have to buy a Smokey Mountain to make good ‘Q.
One thing I would have added to the list is the mini-WSM. That falls into the $100 category and uses the Smokey Joe which is still a kettle, no?
As of January 2014 they no longer make these! I was emailing the owner and he said most folks were buying the less expensive extension ring so he decided to stop making this model – which is too bad!
There is trick I learned years ago that I have never seen mentioned on any bbq forum that works really good: You attach a Weber 7402 charcoal rail on one side of a selected charcoal grate rod, but place it to the left rather than on the center of the rod. Then attach another 7402 rail on the opposite side to the right of the first rail so that the front end of both rails touch. You want to have both rails facing each other with one rail to the left and one rail to the right. You end up with one long rail on the charcoal grate. You can then cover this rail with aluminum foil to create a heat shield. I have used this method long before there was ever a smokenator and I have never felt a need to own one or a need to bother with bricks. Easier to do than to explain but it does work well if you want to split the grill into two sections and create a separate smoking section similar in size to the smokenator. In fact I place food on the charcoal grate similar to picture in item 5.
The Cajun Bandit Weber Smoker Conversion Kit is no longer available as they have stopped making them. I sent an email out to the company end of summer of 2013 and was told at this point they are not producing them any more. Too bad…….
Wonderful, informative article. Thanks. I like the idea of using a large pizza pan size pan on the bottom (Photo 2). that would be good for the one-touch which is somewhat difficult to control air flow with.
This is what I do to convert my weber kettle grill to a smoker is to plug up 2 of the 3 vents. I use 6 magnets to hold a folded piece of foil over each hole. I picked up the magnets at a hardware store.
Now I can point the open vent to the wind, if there is any.
I bank 50 pieces of unlit charcoal over the open vent. add a dozen pieces of lit briquettes over them. I use a hardwood log to hold everything in place. Hickory for pork, red oak for beef. I then use my probe thermometer inserted in a half potato to monitor temps.
the logs slowly smokes and with the drip pan under the meat opposite the fire I’m ready to go. I usually get about 6 hours before I have to add anything. naturally the lid vent goes over the meat.
Try it out. I’ve tried a lot of gadgets but this works best. So good in fact, I sold by ’04 WSM my daughter gave me, because I never used it. If someone shows me how to attach a photo to this comment, I will show you.
I told my significant other (S.O.) weeks ago I wanted to set up a smoker and that I thought the Weber kettle (large one) would be perfect. Not much interest shown by S.O. so have decided to do it myself.
So – with little knowledge, here goes: what sort of wood do I get for smoking chick peas. OK May seem like a “Chick” question – but have you ever tasted smoked hummas – to absolutely die for! That’s the first thing I will do – I have a list of other things, mostly meats but want to start small. Any hints for a newbie? C
I need to try smoked hummus! Do you smoke the chickpeas after they are boiled? ( Google says after boiling…) I saw one article that suggested using mesquite which is the strongest smoke flavor. I would suggest trying what you have on hand and just keep testing the flavor until you get what you want. Given what I have on hand, I would also try oak, apple, maple, cherry… Cherry has the interesting property that you can taste the cherry flavor in foods smoked with cherry wood.
Why is there a sheet of metal covering the charcoal grate on the bank + bricks? It’s never mentioned nor accounted for in the costs. Nor does it appear in any other method though there may be one in the bank + smoke method.
The sheet metal covers the charcoal grate to not allow air coming in through the bottom vents to not cool the smoking meat area down. It means fresh air is only able to go to the coals. I have used the banked method with fire bricks a lot and have used aluminium foil for this. Just remember not to cover the charcoal grate beneath the coals.
I bought a Smokenator last month for my 22″ Webber and smoked a three pound brisket. It worked well, but I still needed to add charcoal and water every hour. I’m going to try a boneless turkey breast next.
Cajun bandit conversion kit no longer available.
Only the stacker
You should add the Vortex to this list. A great gadget for under $50. You can go indirect, direct and even create an infrared like sear. It’s particularly great for smoking wings, but I use it far more than my Smokenator. He’s got a Facebook page, but some of the better info is from what of the distributors: http://owensbbq.com/vortex.html.
I’ve been using the Smokenator for a couple of years now. We do up to 50 pounds of bacon every month on my 22.5 OTG with the Smokinator installed. I also use it for turkeys during the holiday season. Works great, though there are other ways of doing it.
I definitely use the water pan, but sit it on the grill grate above the cutout for it. I simply slide it over, flip the grate “door” open and add charcoal or a pouch of chips. One guy I saw found metal cups that sit in the “charcoal” holes and puts water in those, leaving the larger water pan cutout open. I will do that if I ever run into the metal water glasses that will fit the round cutouts and not drop through.
The water pan helps keep the temperature shifts down, at least some. I monitored my Weber/Smokenator setup with dual probes when I first got it constantly. I found it to be less “bouncy” with the water pan in.
If you want a simple setup for occasional smoking on your Weber Kettle, I highly recommend the Smokenator.
In place of a smoker stacker ring as you described above, I use my trusty Weber Rotisserie ring. Forming the coal snake on the coal rack, then using two Weber warming racks on the regular cooking grid and an 18″ cooking grid on top of them, I can cook 2 10 pound pork butts no problem.
In place of a smoker stacker ring as you described above, i use my trusty Weber Rotisserie ring. Forming the coal snake on the coal rack, than using two Weber warming racks on the regular cooking grid and an 18″ cooking grid on top of them, I can cook 2 10 pound pork butts no problem.
I have one of the stainless steel Wok inserts for my 22.5″ Kettle. I also have a Stacker from Cajun Bandit. I did not like having to sacrifice grill space to hold a water container.
So, i start the charcoal as they suggest, but without their ring. Once that is going, I put my old Weber Kettle Wok in place, fill it with water up to the rim, and put the stacker in place. The wok and water do a much better job of keeping steady heat, and moisture. And I can lift the lid to check the meat, and add or remove meat, without the fat drippings flaring up in my face.
Note, this is not the new Wok/grate combo thingy, this is the old wok that replaces the grill entirely.
I just wanted to thank you for the Wok suggestion. I use this with a Smoke EZ on Weber Performer and it allows for a very consistent 225 degrees. You can pick these up on ebay right now for about 15 dollars shipping included.
Please follow & like us :)
Grill Restoration Guides
Weber Grill History
This site rocks the Pearsonified Skin for Thesis.
The Best Setup And Accessories For A Weber Smokey Mountain Barbecue Smoker And Other Bullet Shaped Charcoal Smokers
"Seven days without barbecue makes one weak." Anonymous reader
There are a number of bullet-shaped charcoal smokers out there and they are pretty easy to use. The best is the Weber Smokey Mountain (WSM) which now comes in three sizes.
The Apollo has some design improvements but users complain about build quality. The bullets from Brinkmann are popular, but very poor imitations. They should be avoided.
Below, in brief, is all you need to get started. Later you can play with more or less wood, more or less coal, vent settings, etc.
Seasoning and calibrating your smoker with dry runs
The first thing to do after you assemble your new grill or smoker is to season it and calibrate it by doing a few dry runs without food. This will burn off any manufacturer's grease, and give you a sense for how to set it up to hit the two important target temps that almost all my recipes use: 225°F and 325°F.
Of course, in order to do this, you absolutely positively must have a good digital oven thermometer. I don't care how much you spent, the bi-metal dial thermometer that came with it is cheap and unreliable and likely to be off by as much as 50°F. Worse still, it is in the dome, and the temp down on the grate where the meat sits is much different. Like a musician, you must master your instrument to make great food.
Harry Soo is one of the top cooks on the barbecue competition circuit and his team, Slap Yo' Daddy BBQ from Diamond Bar, CA, wins tens of thousands of dollars every year. He cooks on 18.5" Weber Smokey Mountains he bought on Amazon, not the $15,000 big rigs most of the other teams use. He also teaches classes. Harry conducted an extremely informative seminar on the operation of the WSM for the Pitmaster Club and if you are a member you can watch it here.
He says "The key step once your smoker arrives is to ensure you season it properly. New WSMs will tend to overheat until you are able to season the inside. The fastest way to season is to do the following:
"Cover the water pan completely with aluminum foil and run a full load of lit Kingsford blue bag briquets and let it run as hot as it can with no water in the pan (over 350°F) to burn off any manufacturing residue. Clean out the ash.
"Fill the charcoal basket 1/2 full of unlit briquets. Hollow out the center so you can see the grate, amking a donut of charcoal. Then put in a 1/2 chimney of lit Kingsford briquets in the middle. This will allow a slow burn for three to five hours on a 72°F day. Adjust the vents to get 275°F on the dome thermometer. Put in bacon strips, chicken parts, pork fat, or any other scrap meat you don't plan to eat. The key is to get fatty meats to generate lots of vapors. Toss in a couple of tennis ball size wood chunks to generate smoke.
"Repeat the above step at least twice before you cook meat that you want to eat. Remember to always empty the ash from the bottom and grease on the foiled water pan to avoid fires and any rancid old oil smell before you cook. Also, I never cook seafood and hotdogs on WSMs that will cook pork, beef, or poultry. Nothing destroys the aroma faster. That's why you should buy a second smoker if you plan to cook seafood or hotdogs."
After cooking Soo uses a wire brush to scrape off creosote and grease, but not the dull black coat that reduces reflection of heat waves. You want the interior dull, but you don't want rancid grease.
Cooking with your bullet
1) Clean out the ash from the bottom of the smoker. It is essential that nothing blocks the air intakes. Besides, ash absorbs heat. If you can, buy another spare bottom grate and lay it on top of the one that came with your WSM with the bars perpendicular, creating a checkerboard pattern. This will prevent coals and wood from falling through.
2) Open the vent on the top all the way, and open the bottom vents half way.
3) There are a number of methods to start and maintain the fire all better than the method recommended by Weber. If you light all the coals at once, as Weber recommends, they will burn hot at first and then cool off. Of course we want to get the pit to a target temp and hold it steady. The best way to set up your fire is with one of the many variations of the Minion Method, named after Jim Minion, a caterer who invented the technique.
Here are the best methods for you to try. Do a dry run or two without food to figure out exactly how many coals works for you. It is really important to use a good thermometer and keep a cooking log when using a WSM, at least until you understand how it works . And remember, don't soak the wood because wet wood just cools the fire, and for chicken and turkey, you don't need any wood at all, the coals emit enough smoke. Click here to read why and more about wood and smoke.

The Original Minion Method. The original Minion Method says to pour unlit coals in the ring and pour a chimney of hot coals on top. As the hot coals burn out the new coals fire up. The Minion method is much better at keeping the temp steady because it lights new coals as the old ones burn out.
Soo's Donut. Soo uses a modified Minion Method that I call Soo's Donut. Get a 16 pound bag of plain old fashioned Kingsford briquets. They burn steady and relatively clean. Click here to read more about charcoal types and why Soo and I and many others prefer Blue Bag over all the others including the expensive "natural" lump charcoals. Fill a Weber chimney half way (40 coals), light them, and wait until they are all coated with white ash. The exact number of coals will vary depending on the brand you use and the weather.
Fill the ring with unlit coals into the fire ring, and dig a hole in the center all the way downand about 8" wide forming a charcoal donut. Bury 3 to 4 chunks of wood in the donut at different distances from the center. You can use chips or pellets, but I prefer chunks because they ignite and smolder slowly. Then pour the hot coals into the hole. The hot coals begin to burn out after a while but as they do, they ignite the coals near them and the new coals ignite the coals near them so the fire moves from the center to the edges.
The Fuse. I prefer this method for the large WSM because this unit tends to run hotter than the smaller unit and the fuse helps me keep the temp down to 225°F. Create a donut as above, but put a stack of bricks or a big rock in the center to keep the coals from falling into the hole. Then take a bite out of the donut about 8" so it is now a big C shape.
Fill a Weber chimney about 1/2 way and get the coals fully engaged. Pour the lit coals over one end of the C, not in the center. Space about three chunks of wood in a line near the hot coals. The lit coals will provide you with heat and smoke and slowly ignite the rest of the coals in the manner of a fuse, burning around the C, producing a nice even heat for a long time. The bricks absorb and emit heat helping hold temps steady.
The Pyramid. Build a pyramid of coals in the center of the ring. Put a Weber paraffin cube under the top coal and light it. It will start up more slowly but will not overshoot the target temp easily.
4) Place the cooking grates right on top of the hot coals to heat them up so you can scrape them clean. Old grease and rust can taint the flavor of your food. Remove the clean grates.
5) Put together the rest of the smoker positioning the door so it is easily accessible. Line the water pan with heavy duty aluminum foil. This will make cleanup easier. Insert the water pan and fill it within 1/2" of the top with hot water. Try to use hot water since it will absorb less heat and help get the oven up to temp faster. Click here to read more about what goes in the water pan. Place the cooking grates in position.
Soo does things differently, so you can experiment with my method and his: "Don't use any water in the pan. Just cover the water pan with foil top and bottom. I foil it twice so I can remove the second layer after the cook and refoil it. That way, I don't have to clean my pan. Dry heat allows the bark to form faster on the meat. Once the bark forms, you can introduce moisture. I just spray the meat with water every hour. To test for properly formed bark, use your finger nail and scrape the meat surface. If the crust has formed, it will not come off when you gently scrape it with your fingernail. If the crust comes off, the bark has not set, so don't spray until it sets. Let it cook longer and check back in 15 minutes. When the bark is set, I then wrap the meat in foil for about an hour, take it out and let it dry a bit. I've won many awards with this technique."
6) Normally I recommend you control temp with the bottom vents and leave the top open. But the door on the WSM leaks so badly that the coals get air from there. So on this device, you need to close the top vent and the bottom vents together to lower temp, because the top vent creates the suction, called the draft, that pulls in oxygen through the door.
When the temp gets up to about 200°F, and it will get there quickly on a hot day, throttle back the vents to about 1/3 open and keep fiddling with them until you stabilize at about 225 to 250°F. Regulating temp may be a bit trickier on a new unit until it has built up a nice deposit of carbon on the inside. New units can run a bit hot because they are reflective. For recipes that call for 325°F, like my Ultimate Turkey, use more lit coals and more air. If necessary, leave the water pan dry or use sand in it. The sand becomes a big heat sink and helps stabilize fluctuations. Click here to learn more about controlling temp with vents.

7) Insert a meat thermometer probe into the center of large cuts (it is next to impossible to get an accurate reading on ribs so don't bother, there are other ways to tell when they are ready). Make sure the probe is not in contact with the bone. Add the meat. If you can fit it all on one grate, use the top grate and remove the lower grate so it doesn't get all gunky from drippings. If you need to use both grates, put the faster cooking food on top so it is easier to remove. Be aware that the top rack meats will drip on the lower meats, so I never put poultry or fish under pork or beef. If you are cooking both beef and pork, I put pork on top. If I want both meats to finish together, I often swap the top and bottom shelves. They will progress differently because the top grate is usually 10 to 20°F warmer than the grate above the water pan. A pan of beans on the lower shelf is always a good idea.
Place an oven thermometer probe near the meat but not touching the grate. Keep it at least 1" away from the meat because there is a cold air bubble around the meat. Do not meter the temp at the dome. It is often 10 to 15°F hotter than the top grate. Thread the cables through a top vent hole.
One of the problems with the 18.5" bullet smokers is that they have 15.5" grates and many slabs of ribs, especially St. Louis cut slabs, don't fit. You don't have to cut them in half. The picture here shows one way to get two full slabs on a single rack in a Weber Smokey Mountain: Use rib racks and bend the slabs to fit. If you do this on both the upper and lower grate on a WSM you can get four slabs on. Another technique is to roll the slab in a circle and run a long skewer through the place where then ends overlap. Works great and keeps the ends from burning.
8) Now go drink a beer. After the smoke stops, you can add more wood if you know what you are doing. There's always the risk of oversmoking, so until you really know your machine, don't add any more wood.
9) Every two hours check to make sure the water pan has not dried out. When it gets low, carefully add hot water.
10) When you are done, close all vents to smother the coals and preserve them for the next cook. Just make sure you shake off the ash before you use partially burned coals, and wipe your ash out.
11) When you store your WSM, leave the vents open and take the door off so it will not get moldy inside. Put a good cover over it and make sure it drops low enough to keep rain out of the lower seam. Click here to read about what to do if your WSM gets moldy.
And that's all there is to it. Go drink another beer. Just don't drink the bong water in the pan.
The temperature gradients
If you use a good digital thermometer (and you are, aren't you?), you will notice that the dial in the dome isn't accurate, that the dome temp is hotter than the top grate, and the top grate is hotter than the bottom grate. How much? That depends on the temp of the water in the pan, the ambient air temp outside, if it is sunny, or if it is windy. If it is hot and sunny, that dome can absorb a lot of heat, and if you just added water, the bottom shelf can be a lot cooler. On a nice summer day in the 70s, in the shade with no wind, the dome will be about 10 to 15°F hotter than the top grate which will be 10 to 15°F hotter than the bottom grate. Your mileage may vary.
A lot of WSM owners use the Maverick remote thermometers. They even drill small holes in the side to insert the probes. Don't worry, small holes won't screw up your thermodynamics.
Pimp your WSM

Seal that crappy door with gaskets
The door on a WSM is a bit flimsy and the lid doesn'talways fit tight. Those leaks make temp control a bit harder than it should be. These gaskets made of high quality Nomex with food safe adhesive, won't melt at high temps and boost efficiency. We applied these to our 22.5" WSM and it sealed up those problem areas nicely.
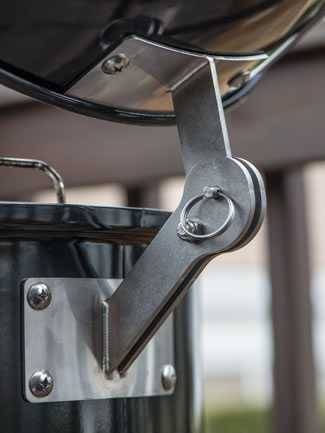
Or get a gasket and hinge kit
The clever folks at Team Unknown got tired of looking for a place to put their hot lid, so they built a stainless steel hinge. Of course everybody who saw it wanted one so now the sell them. It has a clever little latch so when you open the lid it stays open and won't slam on your head when you stick it in there to smell your meat, and a pin that you can remove so you can take the lid off all the way. The pin has a bearing that prevents it from coming out accidentally. Mounting it took 15 minutes. The only problem? I needed to buy a new cover because the old one won't fit ove the hinge.
While you're putting on a hinge, why not get better control over airflow? You can buy a Nomex gasket kit that seals the lid, the base, and the side door. Nomex is rated to handle temps up to 572°F, and it is held in place by RTV silicone rated up to 650°F.
Here's a kit with the hinge and the gaskets that will fit all sizes of WSM. I have both and they work.
Better still: Replace that crappy door altogether
The biggest weakness to the WSM design is the side door. It is flimsy and it leaks, so you cannot control airflow properly and that means you cannot control temp. An inexpensive solution is to put gaskets around the door (above). A more elegant solution is to replace it with the heavy duty stainless steel door from Cajun Bandit. They also sell a grommet kit for thermometer probes, a rotisserie, and a ring that allows you to make the WSM taller so you can insert more racks.
Add a thermostat temperature controller
The WSM is pretty even keeled and once you get the hang of it, keeping it burning at a steady temp is not too hard, but charcoal does burn out and the temp declines. You can compensate for this by controlling the other fuel, oxygen.
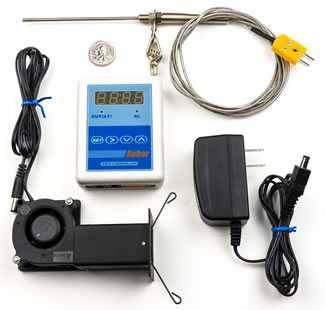
A handful of companies build devices that cover one of the intakes with a fan. The fan is attached to a digital probe that is placed on the cooking surface. The other intakes are closed. You set the desired temp, and the fan controls oxygen to the charcoal. Some of these thermostats are quite sophisticated. They can control multiple cookers, change temps at desired times or temps, and even be controlled by your computer or mobile device. A few are inexpensive, yet effective, and one even operates on batteries.
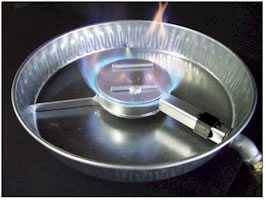
Convert to propane
Live in a building where charcvoal is not allowed? Tired of tending the fire? The folks at Afterburner make conversion kits for WSM and other smokers.
Hovergrill increases the cooking surface
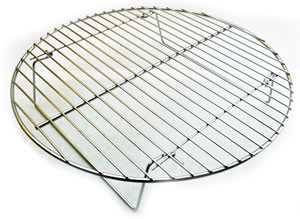
This is a quality stainless steel grate with legs can do three great things for your cooking.
![]()
1) It stands on top of your WSM's cooking grate adding a third rack. It also kits the Weber Kettle.
2) I place it below the cooking grate on my kettle when I cook steaks because I want to raise the charcoal to right below the cooking surface to get max heat focused on the meat. Click here to read more about making steakhouse quality steaks.

Keep charcoal from falling through the grates
Add a second charcoal grate and place it on top of the original perpindicular so the grates for a cross-hatch pattern.

There is clearly a lot of clever thought and engineering in this thing and the owner of the company is a real sweet guy.
There is a rod that connects to your rotisserie motor, if you have a rotisserie. If not you can get one here. Then there are two brackets that go on the rod, each with four arms. The arms hold slotted shelves that hold your food. Turn on your motor and round and round they go like a food Ferris wheel. Well this is the exact same concept used in large commercial restaurant smokers because the heat and smoke enter them from a small area at the back, and the Ferris wheel allows the food to move around in the cooking chamber in and out of hot spots so all of it cooks evenly. The Ribolator isn't going to improve quality of the meat on most cookers, but where it really shines is on the WSM where it can increase capacity.
That said, it can only handle narrow slabs that can be confined within the shelves. Wide spareribs bang into the other shelves and spill the contents out. And if you are only cooking one slab, you have to counterbalance the opposite shelf with rocks or something. Then the meat drips on them.
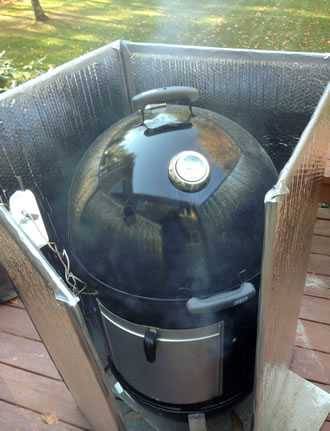
Winter cooking
The WSM is not insulated and the metal is thin. In cold windy weather it helps to protect you smoker from the elements. The best method is to build a plywood box with hinges at the joint. Then get a roll of Reflectix Double Foil Insulation , which has a bubble wrap type interior clad in a foil sheathing. Here is a photo of a shield built by reader Jim Streisand by wrapping Reflectix around a spare wire dog crate he had. Notice the Maverick thermometer with a hole drilled for the probe. See more clever cold weather solutions here.
Cold weather jacket
The Cold Weather Jacket is silicone coated jacket is designed to insulate your 22.5" Weber Smokey Mountain while cooking and it can easily be adapted for a Weber Kettle. Silicone coated, it is great for use in cool, rainy, and windy conditions or as as a weather cover while not using your cooker. It has a flap that opens for reading the temperature indicator, grasping the handle, and adjusting the exhaust vent, and another flap through which you can attach a thermostat controller.
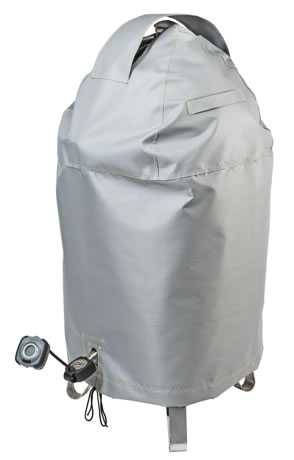
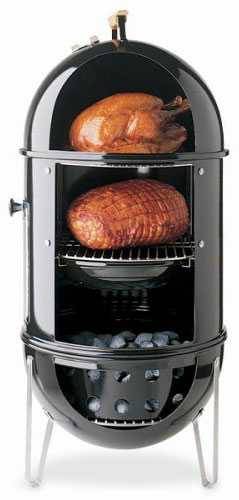
Please read this before posting a comment or question

1) Please try the table of contents or the search box at the top of every page before you cry for help.
2) Try to post your question to the appropriate page.
3) Tell us everything we need to know to help such as the type of cooker and thermometer. Dial thermometers are often off by as much as 50°F so if you are not using a good digital thermometer we probably can't help you with time and temp questions. Please read this article about thermometers.
4) If you are a member of the Pitmaster Club, your comments login is probably different.

Комментариев нет:
Отправить комментарий