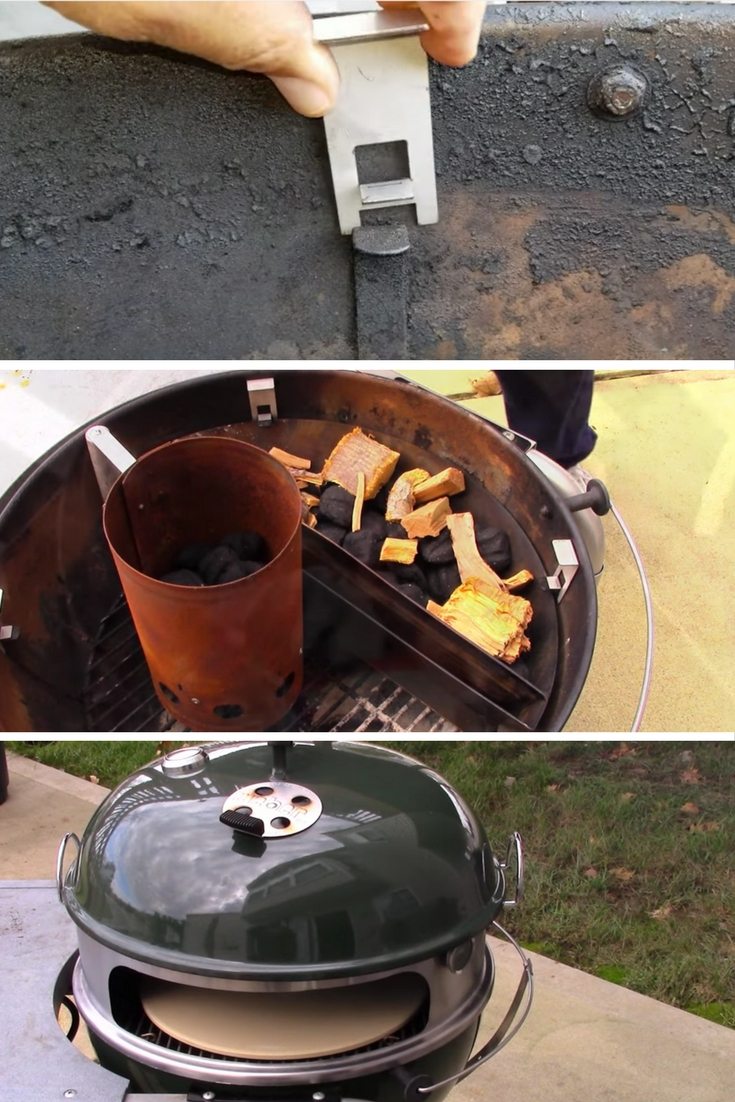
How to Grill Pizza

The first time I heard of making pizza on a grill all I could think of was, why would anyone want to do that?
Now that I’ve done it more than a few times I can think of several reasons, the first being who wants to heat up an oven to 450°F or higher on a hot summer day?
If you use a grill to make pizza, you can keep the heat outside where it belongs. Grills also better mimic a wood fired oven than your conventional indoor oven.
Whether using charcoal or gas, the smoke from the grill will help give your pizza great flavor that you simply cannot get from a regular oven.
It’s also easy! No, the pizza dough does not fall through the grill grates. Assuming you’ve properly heated the grill, your dough will form a lovely lightly browned crust.

The trick is that you cook the plain dough first, on one side, on the grill. Then remove it, flip it, brush the grilled side with sauce and toppings, and return the pizza to the grill for final cooking.

This is a quick how-to on the grilling steps. I’m assuming that you already have pizza dough ready to go, but if not, we have a great recipe here on our homemade pizza post.
Here’s a suggestion. Make a double batch of the dough, then divide it, wrap it in plastic and freeze it.
Then, when you want pizza for dinner, take the dough out of the freezer and put it into the fridge before you go to work, and when you come home take it out of the fridge and put the dough on the counter to warm while you heat up the grill.
Updated from the recipe archive. First posted 2010.
How to Grill Pizza
Make pizza dough from scratch using our pizza dough recipe. Alternatively, you may be able to find prepared pizza dough, in the frozen foods section, at your local supermarket.
Ingredients
- Pizza dough (if using our pizza dough recipe note that it makes enough dough for 2 pizzas)
- Olive oil
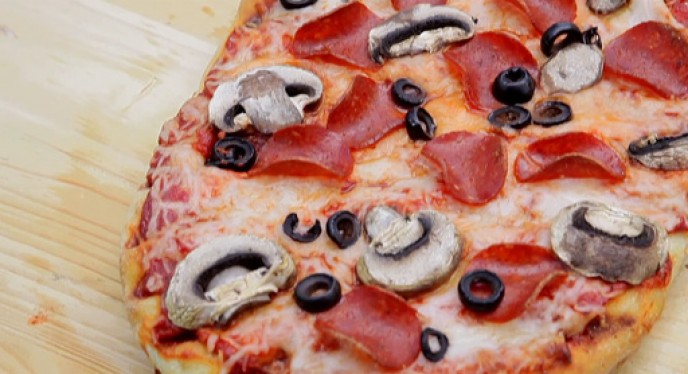
- Standard toppings of tomato sauce, herbs, cheese (mozzarella is the best), and maybe some thinly sliced onions, tomatoes, mushrooms, or pepperoni
- Some flour or corn meal for dusting the cookie sheet or pizza peel
1 Make the pizza dough or use prepared pizza dough.
2 Prepare the grill for high direct heat. Prepare a small bowl with olive oil for greasing the grill grates and for brushing the pizza. Prepare the toppings so they are ready to go on the pizza—tomato sauce, cheese, and anything else you wish.
3 Shape the pizza dough by flattening it with your hands on a slightly floured surface. Either use your fingers to stretch the dough out, or hold up the edges of the dough with your fingers, letting the dough hang and stretch, while working around the edges of the dough.


Once you've stretched the dough, let it sit for 5 minutes and then push out the edges with your fingers again, until you have a nice round shape, about 12-inches in diameter. Do not make a raised rim, it will interfere with the grilling process.


Note that if you are preparing the pizza dough for a party, you can make several pizza dough rounds, stack them separated by parchment paper, and keep them in the refrigerator for up to two hours before cooking.
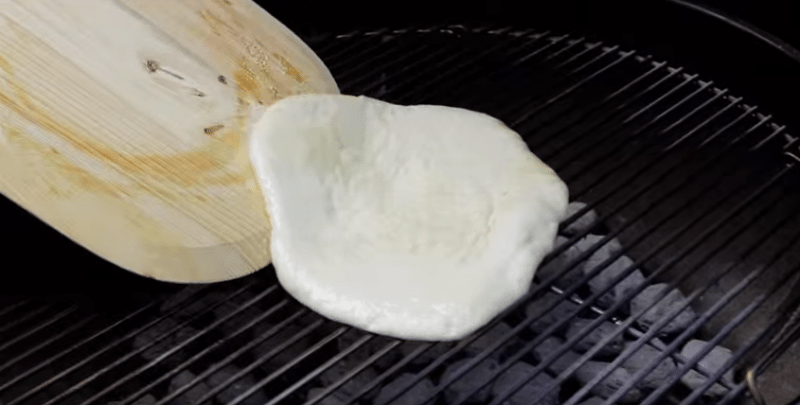
4 Once the grill is hot (you can hold your hands an inch over the grates for no more than 2 seconds), dip a tightly folded up paper towel in olive oil and use tongs to wipe the grill grates. Then place a pizza dough round on a lightly floured (or you can use cornmeal) rimless cookie sheet (or pizza peel if you have one). Let the dough slide off the cookie sheet onto the hot grill grates. Close the lid of the grill and let cook for 2 minutes.


5 After 2 minutes, open the grill and check underneath the dough to see if it is getting browned. If it is on one side, but not another, use a spatula or tongs to rotate the dough 90 degrees and cook for another minute. If it is not beginning to brown, cover the grill and continue to cook a minute at a time until the bottom has begun to brown. It should only take a couple minutes if you have a hot grill. The top of the pizza dough will start bubbling up with air pockets.


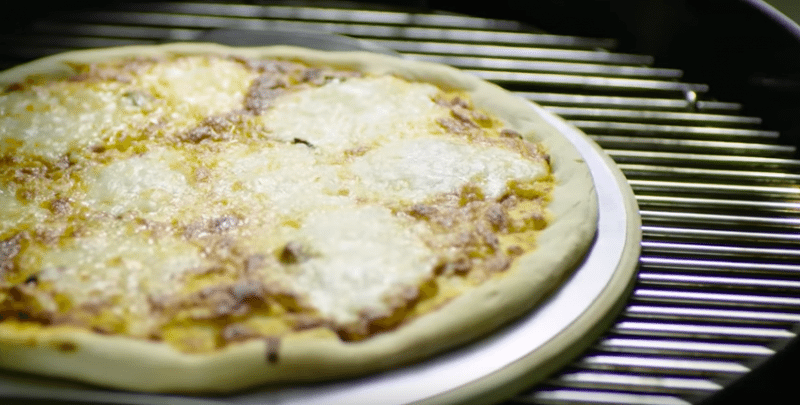
6 Once the pizza dough has browned lightly on one side, use your cookie sheet or pizza peel to remove it from the grill. Use a spatula to flip the dough over so that the grilled side is now up. Keep the grill covered so it retains its heat for the next step.


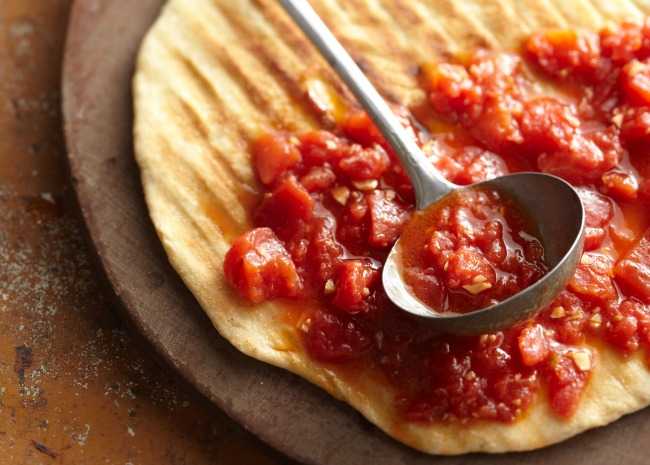
7 Paint the grilled surface of the pizza with a little olive oil, then cover with 1 ladle of sauce – no more, or you'll end up with a soggy pizza. Sprinkle on your toppings, ending with Mozarella cheese (if using), and if using meat, put that over the cheese. Remember to go light on the toppings, or your pizza will be heavy and soggy.


8 Slide the topped pizza back onto the grill. If you are using a gas grill, reduce the heat. If working with a charcoal grill, close the vents on the cover almost all the way. Close the lid and cook for 2-3 minutes more, or until the bottom begins to char and the cheese is bubbly. Pull off the grate with a spatula onto a cutting board or other flat surface and let rest for a couple minutes before cutting into slices.
Slice and serve!
Hello! All photos and content are copyright protected. Please do not use our photos without prior written permission. If you wish to republish this recipe, please rewrite the recipe in your own unique words and link back to How to Grill Pizza on Simply Recipes. Thank you!
If you make this recipe, snap a pic and hashtag it #simplyrecipes — We love to see your creations on Instagram, Facebook, & Twitter!

Showing 4 of 64 Comments
- Sonny
We would love to do these for a gathering over the weekend (about 20 people) Anyone see a problem with grilling the crusts beforehand and finishing them up during the get together. So essentially steps 1-6 will be done about 3-4 hours beforehand and we would finish them up during the bbq. Thanks!
- July 19, 2017
- · 1 Reply
Just made this grilled pizza tonite – fabulous! The grill made this the best homemade pizza we’ve ever had. And an added bonus, my house stayed cool on this hot summer day! Thank you!
- July 16, 2017
Tried this last night and it was amazing! Thanks Elise! I will be grilling my pizzas for now on!
Pizza and watching how people make it interesting. When people first discover pizza they go through all sorts of gyrations and concoctions. Some people eventually get serious about how to really make pizza. The Italians are good at it. They’ve been doing it for hundreds of years, even before tomatoes were brought back from the Americas. That said, lots of “Italian” pizzerias in the US produce rubbish. Before tomatoes and cheese, pizza was really just focaccia. Tomato sauce and cheese came later. European Italian pies pizzas are generally much healthier than American pies which are loaded with fat and salt.
The regulations here prevent me from having a charcoal or gas grill, only electric which loses all its heat when you open the lid. I am forced to use a stone in a pre-heated 500 degree oven and then switch the broiler on when I slide in the pie. Most home-use ovens max out at 500 degrees.
I used to put the dough in the oven for just a minute or so to make it easier to handle. The toppings can tend to slide off a bit more. Now I just put the completed pie with raw dough into the oven, the way it’s been done for hundreds of years.
Everybody has different ways of making pizza. That’s part of cooking, arriving at your own destination along a different path.
Nowadays I make mostly a veggie pie, homemade cold risen dough, homemade sauce with either fresh plum tomatoes or canned San Marzanos, non-Italian extra virgin olive oil*, a couple secret ingredients, fresh mozzarella, onion, mushroom and red and green bell peppers. I typically don’t do pepperoni, sausage, bacon or pineapple and ham, just veggies. Try buffalo mozzarella if you get a chance. That’s Asian water buffalo mozzarella, not the American bison. Water buffalo were brought to Italy from Asia (Marco Polo?).
If you really want to impress people, get your pies DOC certified. That says you know how to make real pizza, really well.
*Italians are known to cut their extra virgin olive oil with inferior or even rancid oil. Sometimes they blend in non-olive oils. So I don’t buy any Italian EVOO. American made EVOO is excellent but hard to find because the stores mostly only sell Italian and maybe once in a while you’ll see Greek or Spanish oils on the shelf. Ask yourself, how is it that Italy can export more olive oil than it produces? Where is that extra oil coming from?
- · 1 Reply
Had some friends over for dinner last night and grilled two pizzas per your instructions. Turned out AMAZING! I don’t know why I hadn’t tried grilling pizza sooner. Thanks so much. :)
Recipe Categories
Main Ingredient
Special Diet
Season
Recipe Type


What's in Season?
Browse all of our December recipes.
Measurement Converter
Discover More
- Subscribe to new recipes for FREE!
- Follow Simply Recipes or get recipe updates on Twitter
- Press and Awards
Welcome to Simply Recipes

Thank you for stopping by! We love to share wholesome and delicious recipes, perfect for home cooked family meals.
Pizza Stone
Built for Gourmet BBQ System cooking grates

Enjoy life as they do in Bella Italia. Envision feasting on a gourmet pizza, made in a masonry oven, on a quaint patio in Naples. Now, imagine eating that same pizza in the comfort of your own backyard. Let the Gourmet BBQ System Pizza Stone save you the trip. Whether making pizza, bread, or dessert, enjoy a taste of la dolce vita any night of the week.
- Individual Carton Dimensions 16.3"H x 4.4"W x 15.8"D
- Out Of Carton Dimensions 2"H x 13.2"W x 16.7"D
- Material Cordierite
- Care Instructions Brush clean and rinse with water, no soap
- Features
- Cordierite stone absorbs moisture for light and crispy thin crust pizza
- Carry rack makes transporting the pizza quick and easy
- Fits into the Gourmet BBQ System cooking grate so that it stays in place while grilling
Enjoy life as they do in Bella Italia. Envision feasting on a gourmet pizza, made in a masonry oven, on a quaint patio in Naples. Now, imagine eating that same pizza in the comfort of your own backyard. Let the Gourmet BBQ System Pizza Stone save you the trip. Whether making pizza, bread, or dessert, enjoy a taste of la dolce vita any night of the week.
- Explore
- Accessories
- Grills
- Recipes
- Blog
- Grill Skills
- Prep School
- Support
- FAQs
- Find a Dealer
- Manuals
- Shipping & Returns
- Register Grill
- Replacement
- Warranty Info
- Company
- About Us
- Job Opportunities
- Weber Newsroom
- Weber Restaurant
- Privacy Policy
- Legal Notice
- Customer Service
- 1-800-446-1071
- 7 DAYS A WEEK, 7AM-9PM CT
- SUPPORT@WEBERSTEPHEN.COM
STAY CLOSE TO THE GRILL
Find out what’s new from Weber, including recipes, product information, personalized communications and so much more!
How To Make the Best Grilled Pizza
We have talked about grilled pizza quite a bit here at The Kitchn, but what if you've never actually tried this method? Well, we have just what you need. Here is a step-by-step tutorial on grilling pizza. Honestly, this method is not hard, once you get the hang of it, and thanks to the extra-high heat of the grill, it makes some of the best pizza you'll ever eat!
Why Grill Pizza?
Grilling pizza isn't just an alternate method for when you don't want to heat up your oven (although that is a side benefit). The best pizza is made in the hottest oven possible, and since your grill can get so much hotter than your oven, for most people it is the best instrument for making terrific pizza.
Your kitchen isn't heated up by the oven, and a blazingly hot grill means a crisper bite and those deliciously charred spots on the bottom of the crust. Not too charred, of course, but hopefully just enough for your taste!
Successful Grilled Pizza Belongs to the Organized
I actually used to be very intimidated by grilling pizza. I had a couple of bad experiences (charred crust! Flaming pizza sauce!) but then I got my method straight. It's not hard, but you do need to be organized.
When you grill pizza, you need to have everything ready to go — all the toppings, the sauce, the cheese. This is because the key to pizza on the grill is to top the pizza after you've put it on the grill. It also helps if you cook the dough for a minute or two, flip it, and then top it.
Also, I love really thin-crust pizza (think wafer-thin), but I leave my crusts slightly thicker when grilling — the pizza stays nicely chewy with a crisp crust, and it won't fall through the grates. Here's the pizza dough recipe I like to use, plus a few good sauce recipes.
Essential Grilled Pizza Recipes
Topping Inspiration & Recipes
How To Make the Best Grilled Pizza
What You Need
Ingredients
pizza dough (about 1 pound), store-bought or homemade
tomato sauce, store-bought or homemade
Cheese such as torn mozzarella, grated Asiago or Swiss, and grated Parmesan
Toppings such as herbs, thinly sliced vegetables, pepperoni and salami, prosciutto, chopped greens such as kale, or diced tomatoes
Grill, gas or charcoal
Instructions
Heat the grill: You should heat it quite hot; my grill was about 600°F with the lid on while baking this particular pizza. Aim for at least 550°F. If you have a choice on your grill between direct and indirect heat, set it up so the pizza is over direct heat.
Gather your ingredients and toppings: Set up a table or bench near the grill so you have easy access to everything. Good grilled pizza is as much about the organization and logistics as it is about actual cooking!
Also have your tools close to hand: You will want a pair of long metal tongs. A spatula may be helpful, although not absolutely necessary. You may want a hot pad or oven mitt if your grill lid gets hot.
Prep your dough: It should be stretched or rolled out into a thin circle. (Circle-ish — as you can see, my pizzas usually resemble continents more than they do the moon!)
Brush the dough with olive oil: Brush one side of the dough with oil; this is the side you'll lay down on the grill.
Grill one side of the pizza: Take the lid off the grill. Lay the dough round on the grill with the olive-oil side down. Brush the top of the dough with a thin layer of olive oil, too. Let the dough cook for about 3 minutes, with the lid off, or 1 to 2 minutes with the lid on. Use the tongs to lift up the dough from time to time, checking on how it is doing. You want grill marks on it, but you don't want the dough to get crispy; it should be just set.
Top the pizza: Flip the dough over with the tongs or spatula. The dough should come up easily and flip without tearing. Now is where your organization comes in! You need to top the pizza quickly. Spread on a thin layer of sauce, some cheese, and toppings. It shouldn't be too heavily loaded, or the pizza won't cook well.
Cook the pizza: Put the lid on and cook for 3 to 5 minutes. Use your sense of smell; if the pizza smells like it's scorching, take the lid off and move the pizza to a cooler part of the grill or turn the heat down.
Remove the finished pizza: Remove the lid and check the pizza. The edges should be crisp and well-done, and the cheese should all be melted. Drag the pizza off with the spatula or tongs. Let cool for 3 minutes, then cut into pieces and eat!
Recipe Notes
Every grill is different! You know your grill and it cooks differently than mine. Your pizza may take longer or shorter depending on how hot the grill gets and where your areas of direct and indirect heat are. Consider your first pizza a sacrifice to learning just how to control your grill temperature.
Cooking times will vary! On that same note, of course, you need to keep an eye on the heat. This method works perfectly every time on my own grill, but the timing depends on how thin you stretch your dough, and how hot your grill gets. Flipping the dough gives you an extra measure of control and certainty, though, that the crust will be cooked through by the time your toppings have melted and warmed.
This post has been updated — first published July 2010.
- Calories 233
- Fat 5.3 g (8.2%)
- Saturated 1.7 g (8.5%)
- Trans 0.1 g
- Carbs 37.9 g (12.6%)
- Fiber 2 g (8.2%)
- Sugars 0.6 g
- Protein 7.8 g (15.5%)
- Cholesterol 4.8 mg (1.6%)
- Sodium 493.5 mg (20.6%)
Submit a story
Got a tip, kitchen tour, or other story our readers should see?
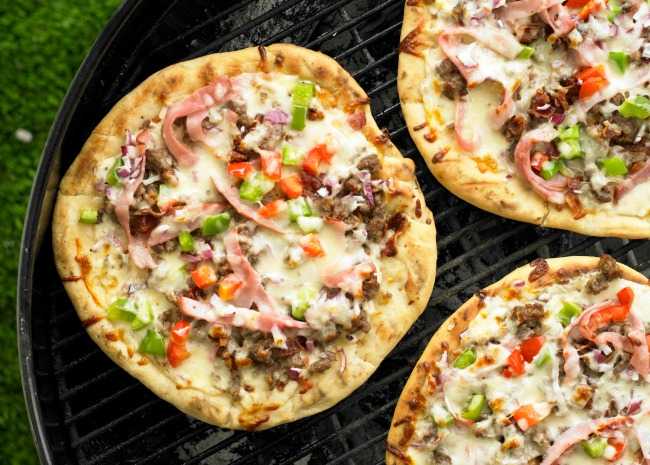
Pizza weber grill
Homemade Pizza on the Grill
Put down that phone. Before you call for delivery, check out these 10 easy tips to cooking a homemade pizza on your grill. You’ll need dough, fuel for direct cooking, clean grates, ingredients for building your awesome pizza, and a timer. Ready, set, GRILL!
What are your thoughts? (23)
Hey Kevin if you haven't tried it please do. Takes the pizza to whole new level. I cooked same as in video but I added 1 chunk of apple wood soacked in water, amazing flavor also now making grilled deep dish pizzas. Pulled pork good topping.
Kevin Kolman
Thanks for the tips my BBQ friend. Looks like I have some grilled pizzas in my future. Have a great holiday season and New Year and most important Grill On!!
Thanks Kevin for getting back to me. Few days later I posted the comment I was actually asked to cook some pizzas for our local fire house so I fired up 3 of my Weber kettle grills and made strombolis, calzones, and course pizzas went over awesome. And grilled some up for the next door neighbors.
Kevin Kolman
Wow sounds like you have mastered the art of baking and grilling pizza on a kettle!! Keep up all the grate work and Grill On!!
Hey Kevin got question I cooked the pizza just like you did on my performer temp was at about 375 came out great. But I just read a recipe where you cook it over direct heat at 550 degree s for 3 min with lid off and then 2 min on after you add toppings. Do you think that would get scorched. I know pizza oven can get pretty hot. Also live the coat I need one
Kevin Kolman
I would stay away from the method you are reading about. I would bet the pizza gets scorched on the bottom. If you find success which we both have I like to stick to that!! Although I like being adventurous I do not like it being the cause of bad grilled food. You need the convection heat to melt the cheese and cook the pizza. Hope this helps, good idea checking, keep those perfect pizzas coming and always, Grill On!!
Christopher S
My vote is for the blue one. but orange is a close 2nd place and green isn't too far behind in 3rd!
Whoa this looks fantastic. On the list to make this fall.
When we moved from New York --- a place known for great pizza --- to Delaware --- a place where good pizza is hard to find, I had to get good at making pizza on the grill. Now we have it every week or so, all year long.
I have both gas and charcoal, even thinking about a smoker. Gives me many choices.
Don't own a WSM, but I know they're a true favorite of barbecue enthusiasts everywhere.
Can't wait to try this. I love my pan fried steaks but don't like smoking up the entire house when dropping it in the pan.
Grill Overview
Join the Community

Share and connect with fellow grillers.

Share all of your grill moments.
Trending Topics
Join the Community
Share and connect with fellow grillers.
Share all of your grill moments.
Share Blog Post
Show your friends, family, and neighbors what you learned in the post from the Weber Blog. Just in time for your next barbecue!
A link to the following blog post will be included in the email:
8 Ways To Make Pizza On A Weber Charcoal Grill

If you’re really backyard barbecue savvy, you’ve probably grilled a pizza before. If you haven’t, welcome to a new world of outdoor pizza making on a budget! You don’t need a $6,000 wood-fired pizza oven on your patioВ to get delicious pizza at your next backyard event. With summer coming up, I decided to see exactly what was the best way to make a pizza on a charcoal grill. It turns out, there are quite a few ways to make pizza on a weber charcoal grill!
Here are 8 methods I discovered, each with their own advantages and challenges. Which ones have you tried, and were they a success? If not, what works for you?
Minimalist
Bare Grill Grates
Surprisingly, you can grill a pizza right on the weber grill grates. Just make sure the dough is thick enough that it doesn’t fall through! But just like with making pizza on gas grills, most of the time you’ll be alright. The grates get pretty hot, so your dough will get nice and crispy on one side first.
After that side crisps, flip the dough over to cook on the other side. From there, you can add you sauce, cheese, and toppings. My suggestion is to have your toppings already cooked unless you’re heating them up. For example, raw bacon won’t fully cook this way. But something like pepperoni is fine, since it doesn’t need to be heated to be edible.
As you can see from the image above, spread the coals thin on the bottom of the grill so your pizza cooks evenly, and not too hot. We don’t want to burn the crust! you could also push the coals to one side and put the lid on to use ambient heat temperature to cook rather than direct heat from the coals. Both methods are effective!
Cordierite Pizza Stone
One step up from requiring no preparation, as shown above, is to get yourself a grill-safe pizza stone. Not all stones were made for the direct heat or high temperatures of grills, so be sure to get a pizza stone that’s grill approved [LINK]. I’m working on a list right now and will update that link later.
If you’re using a pizza stone, heat it up slowly! I would place it on the grill with the lid off first. Let it heat up a bit, then place the lid on to get it fully heated. Flick some water on it when you think it’s ready to cook. If the water forms a ball and rolls around,
One trick to use, if you’re using a pizza peel and fresh dough, is to sprinkle a little bit of cornflour onto the peel. It will burn a bit on the pizza stone, but won’t affect the flavor of the pizza. It’ll mean that getting your pizza from the peel to the stone will be easier, and you’ll lose fewer ingredients as well as have less a risk of dropping cheese crumbs on your stone. Cheese immediately melts onto the stone and will turn it black.
Black spots on your stone are quite common, but I prefer to avoid them!
Metal Pizza Pan Or Other Grilling Pan
There’s not much to say about this one since it’s quite similar to the pizza stone method, but you do need to prep your pan a bit differently! Depending on what type of pan you’re using, you can also arrange your coals differently. Using an aluminum pizza baking pan made for the indoor oven, you may want to cover it in foil first, and use nonstick spray to prevent the dough from sticking to the foil.
You may also want to arrange your coals on the sides of the grill to prevent excessive direct heat onto a pan which wasn’t made for the grill. You’ll probably ruin the pan anyway, so we’ll just make that the pizza grillin’ pan from now on LOL.

Alternatively, you could use a cast iron pizza pan with your weber grill and have some lovely tasting pizza too! With this type of pan, you may want to preheat it and season it with olive oil first before putting your dough down. I think this is a better long term method of making your pizza on a grill since the pan will likely last longer and you can use it for other things as well. Cast iron is very sturdy material and great for many camping situations.
You could even toss it over a fire in direct flames and cook your pizza that way, like a true mountain man (or woman).

Fire Bricks
This method is very easy to set up, and may change theВ type o the pizza that you make. The creators of this method claim that they use this to make a “New York Style” pizza as opposed to Neapolitan style pizza. The difference would be cooking temperature and distance from the flame.
With an extra large pizza perchedВ above the coals, your pizza will cook slower, but more evenly. You’ll have the same temperature coming from the top and bottom of the grill, rather than extra heat coming from the bottom. I imagine that’ll produce big floppy pizza slices just like in New York!
The Neapolitan style pizza is what you typically find with wood-fired pizza ovens that cook with direct heat of 700ВєF – 1000ВєF and cook in about 1-2 minutes. Their crusts are chewier, thinner, and crispier.
To get this method going, just place some fire bricks over your weber grill and then lay the pizza pan with parchment paper on top of those bricks.
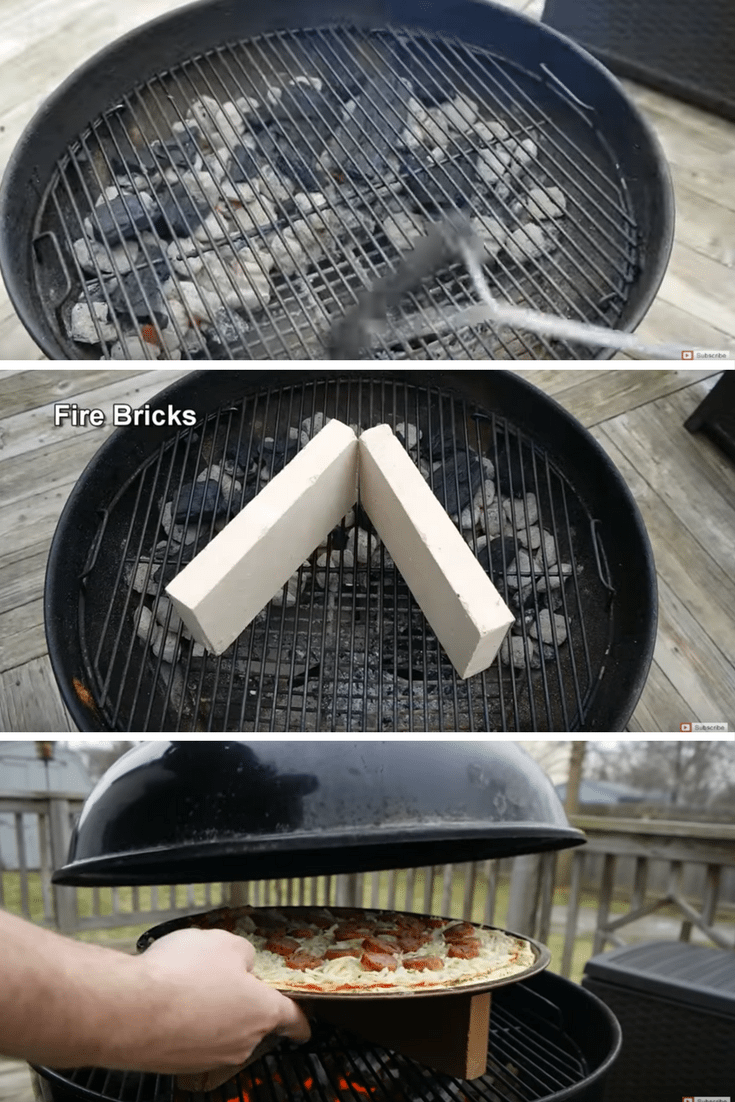
I imagine the extra heat on top will also cook your ingredients more. You can see from the video below that those sausages cook up pretty well even though they look like they were not precooked!В Cook time is about 20 minutes including a break and turn at around the 15 minute mark.
CampFire Style
Skillet Pizza
Kind of like the the cast iron pizza pan from above, but even more “campfire style” is the pizza skillet. I’m looking to develop my own skillet pizza recipe, so look forward to that! But for now, the concept is pretty simple.
- Preheat your skillet over your Weber coal grill
- Season the skillet with olive oil or other nonstick grease
- Place the dough in your skillet carefully!
- Add sauce and toppings
- Place back on grill and close the lid
I think this is a really cool method of cooking pizza on your charcoal grill because it opens the door to making things like thick crust pizza, deep dish pizza, stuffed crust pizza, and other “thick” pizza dishes. How about a pizza pot pie, a skillet calzone, or pizza lasagna? With taller walls on the side of your cast iron skillet you can really get creative with your campfire pizza dishes.

Weber Grill InsertsВ (True Pizza Oven Results!)
These grill inserts made specifically for round charcoal grills take your pizza making to the next level. I talk about Weber grills because they have become synonymous with this style of grilling, but any 18.5 or 22.5 inch round charcoal grill will be able to use these inserts. They are made to fit both the large and small sizes. In fact, you can buy an extension if you have a larger 27 inch grill (26.75 exactly).
The reason these inserts work so well for making authentic pizza is that 1) They use wood and 2) They allow you to reach a hotter temperature. Because you don’t need to remove the lid to insert the pizza, you can get up to around 800Вє and keep it that temperature even while cooking multiple pizzas in one go!
The downside to these accessoriesВ is that you have to feed your grill plenty of wood to maintain that temperature. I was able to cook about 2-3 pizzas per wood burning session. I guess most folks won’t cook more than that, but considering I’m doing a bunch of testing on these, I had to use a whole back of apple wood chunks. That can get a bit price if you are buying them from the store like me, but maybe you have a source of good wood to burn that’ll cut down on the cost.
KettlePizza
KettlePizza is the “name brand” of the bunch, so it’s the first one I bought and tested. I’m still in the testing phase, but was able to get my grill up to over 750 degrees within 10-15 minutes.
Just place your grilling grate inside the center of the KettlePizza insert. Once your coals are lit and your wood is on top of that, you can put the KettlePizza unit on top, then the lid on top of that. Oh, and don’t forget your pizza stone.В That should be piping hot before placing your pizza on it or it will stick!

The cool thing about KettlePizza that other brands don’t have is a set of handles. What are those for? Well, at least in my experience, it meant I was able to refuel easily. I could turn the entire unit to the side-grates that flip up to add more coal briquettes and wood. Once the temperature starts to drop, the only way to get it back up is to add more fuel.
You’ll need a stone and peel with this unit. You can buy the standalone KettlePizza insert, or the combo that includes a pizza stone and pizza peel. This is a good deal because not all stone are made for the grill, so getting KettlePizza’s for-the-grill stone is a good idea. Any aluminum peel is probably fine, but from the high quality material of the insert, I assume the peel is of similar quality.
I purchased the standalone unit because I had a stone and peel already,В so you can purchase them separately if you want to find a specific brand you like. Here is the complete KettlePizza charcoal review, including images of pizzas I made, and comparison to similar products (some of which you’ll see below!).
Oh, and they also make an insert for gas grills too. I actually prefer that one because it doesn’t involve messy coal or buying extra wood chunks. However, it doesn’t have that same “wood fired” pizza effect since there’s no smoke being produced.
I guess most people will just buy the one for the type of grill they have, but if you have both, consider reading my review (linked above) to see which on you think would be better for you.
PizzaQue Deluxe Kettle Grill Kit
The PizzaQue Deluxe Kettle Grill Kit truly is a “kit”. It comes with the Weber grill insert, a pizza peel,В pizza stone intended for grill use, and a charcoal fence. The “fence” is not necessary, but as you can see from the images below, it keep the coals from directly heating the bottom of the pizza. This is how traditional wood fired pizza ovens work. The fire is started in the oven, then pushed to the back of the oven as the fire from the wood dies down and turns into mega hot coals.
It also means you can load up on coals and wood to get 800ВєF+ temperatures. One commenter said they measured over 1000ВєF! That’s pretty damn hot.
As I found out using my own KettlePizza, it’s quite easy to run out of fuel for the grill with just 1-2 pies, so loading up withe extra coals and wood may be necessary. You can also put less, then reload later with the way the PizzaQue is designed.

There are some advantages and disadvantages to the designВ of the PizzaQue, which is a little different than the KettlePizza on the inside (even though the outside looks similar).
First, you do not need the grilling grates that come with the Weber grill. There are two metal supports (triangle shaped) that will hold up your pizza stone. With the charcoal fence that’s included in your kit, it’s quite easy to refuel. Simply remove the lid, add more coals or wood chunks, then replace the lid. With the KettlePizza I needed to lift up the side “gates” in the grill to add coal or wood.
The PizzaQue also sits in a slightly different position than the KettlePizza. It rests on clips on the device itself, rather than the brackets inside the Weber grill. You can see that in the image above. This means the unit sits higher. But it’s also got a lower profile. The stone also sits higher in the oven. I’m not sure how this changes the airflow or cookingВ results, but its worth noting.

One disadvantage to this design is that your pizza stone does not have the full support of the charcoal grill grate. There have been many times where I’ve accidentally moved the stone by hitting it with my pizza peel. Sometimes the pizzas stick to the peel, so you really have to shake the dough off. With the design of PizzaQue, it’s possible to push the stone so it’s not stable on the PizzaQue support brackets.
A major selling point of this brand though, is the price. It’s significantly cheaper than KettlePizza, plus it includes the stone and peel, which you’ll need to buy. The included charcoal fence is also a bi bonus because it seems like you can get a real raging inferno in your grill without worrying about burning your pizza stone or pizza. Many of you may have charcoal bins for the sides of your grill that produce a similar effect already.
Which do I prefer – KettlePizza or PizzaQue? Personally, I prefer the made-in-the USA quality and design of KettlePizza. It comes at a premium price, but there’s a reason for that! However, PizzaQue makes an awesome product that makes it easy to get started cooking wood-fired outdoor pizzas very inexpensive.
OnlyFire Pizza Oven Kit
Yet another brand of “insert” that will transform your Weber charcoal grill into a pizza oven is called “OnlyFire”. This particular brand is currently cheaper than KettlePizza, but more expensive than PizzaQue. Keep in mind that prices may change since this review was written.
One interesting difference between this brand and the other two listed on this page is that the device actually rests on the outside of your weber grill instead of fitting on the inside. I don’t think this adds any functionality to the device, but it’s just an interesting difference.
OnlyFireВ doesn’t seem to sell as well as the other two brands on this page. It doesn’t have as many reviews online, and there are fewer blogs and YouTube videos featuring reviewsВ about it as well. One issue that many buyers ran into initially is that the pizza stone sat below the mouth of the OnlyFire kit, making it nearly impossible to get the pizza out due the angle of your pizza peel. The remedied this with little brackets they call “chips” that you can see in the first image below.
While this is a nice fix, and it seems to work now, it’s another (4) part(s) you have to keep track of.
Another downside is that it only fits the 22.5 inch grills. This is the standard size most grill owners get, butВ both PizzaQue and KettlePizza can fit on the 18.5 inch grill. KettlePizza even makes an expansion for the extra large 27 inch grills.
One last thing to mention that could use improvement here is that the handles are made of metal. That means they’ll be very hot while cooking, so you need oven mitts or barbecue gloves to move it around. If you set yourself up right in the beginning, you won’t have to move the OnlyFire device. But the wooden handles of the KettlePizza (also placed further away from the fire) are much more convenient.
In all, this isn’t really a device I’d recommend. Compared with the KettlePizza which is my #1 choice, and the PizzaQue which sells at a big discount, this model doesn’t have a major quality which makes it stand out
Which method do you think you’ll use this summer? Do you have a different way to make pizza on your charcoal grill? Let us know in the comment section!
Leave a Reply Cancel reply

Hi! My name is Rick and FoodForNet.com is just website about food and drink that I like. That includes sous vide, slow cooking, grilling, smoking, and homemade pizzas.
I also make my own beer, wine, cider, kombucha, and sake… and am a whiskey enthusiast!
Best Recipe Roundups

40 Foods, Drinks, and Condiments That Are Naturally Gluten Free
10 Amazing Sous Vide Pork Recipes

10 Mexican Sous Vide Recipes: Including Tacos, Carnitas, Queso, & A Mole Infusion
10 Succulent Sous Vide Shrimp, Crab, & Lobster Recipes

25 Food-Inspired Cocktails That Will Make You Say Yum!
Quick & Easy Recipes

Quick Raw Raspberry Ice Cream
Affogato with Lavender Shortbread, and Cynar
Smoked Salmon, Asparagus & Herbed Creme Fraiche
Potato Flour Pizza Dough Recipe

Sous Vide French Fries
Amazon Affiliate Disclosure
FoodForNet is a participant in the Amazon Services LLC Associates Program, an affiliate advertising program designed to provide a means for sites to earn advertising fees by advertising and linking to Amazon.com
General Affiliate Disclosure
Some links on my website contain affiliate links. That means I make a commission from sales of things you buy if you click the links on the pages here. However, I always write honest reviews and sponsored posts are always labeled as such. Just wanted to let you know!
Pizza weber grill
Our experts are grilling delicious food on authentic Weber Charcoal Kettles.
Our Restaurant
The Weber Grill Restaurant is the result of over 60 years of Classic Outdoor Grilling—from the people who invented the Weber Charcoal kettle grill. You‘ll taste the difference that decades of grilling expertise make. More than a steakhouse & BBQ, our chefs are the grilling experts for seafood and vegetable specials as well. Our secret: a commitment to using quality ingredients, innovative recipes, honed grilling technique, and Weber charcoal kettles. We are especially proud of our Hand-Cut Black Angus Steaks, Wood-Smoked Barbecue, Fire-Inspired Seasonal Entrees, Charcoal Seared Burgers and Fresh Grilled Seafood.
HAPPY HOUR @ CAMP HILL
Happy hour features a long list of good deals on food and drinks.
Copyright В© The Pizza Grille. All Rights Reserved.
Website Design by


Simply The Best Pizza and So Much More.
The Pizza Grille offers stylish and casual dining at each of our locations in Lemoyne, Camp Hill & Carlisle, which all include covered outdoor dining year round.
Voted Simply the Best by Harrisburg Magazine since 2003, The Pizza Grille offers award winning gourmet pizzas, hand chopped salads, fresh seafood, specialty sandwiches, pasta, homemade soups & more. Our homemade pizza dough is made in house daily & we strive to use the freshest ingredients from our local suppliers.
Copyright В© The Pizza Grille. All Rights Reserved.
Kettle Pizza Review: Weber Grill Pizza Oven

The Kettle Pizza converts a Weber Charcoal grill into an amazing pizza oven.
The Weber charcoal grill is one of the most versatile cookers available. Right out of the box, without spending a dime on gadgets or accessories, the Weber kettle can do pretty much anything – including make a damn good pizza. This has been my mantra for years, and for good reasons. Avoiding novelties and luxury accessories has forced me to really learn and adapt and understand the science behind great food.
But lets not get snobbish at a caveman level. The Weber kettle can make a pretty good pizza pie, but the style of pizza is limited to thicker crusts and pan pies. Plus they take longer and can only do one at a time. Making pizza on a regular Weber is not a great experience. You can do it, but it sucks. The lid just doesn’t have the right airflow and heat retention to cook a pizza properly. That’s right, now it’s time to get snobbish .
A good pizza, thin and crispy like they should be, needs to be cooked on a blistering hot stone. STONE. Bakers use stone because it absorbs the moisture from the crust as it bakes, making the crust CRISPIER. When the stretched dough hits the hot stone, the proteins in the dough stick to the stone and an eruption of air and vapor bubbles form within the dough as it cooks. The faster this happens, the better texture and flavor the crust will have. Good pizza needs to have high heat coming from above as well. We’re not just talking about melting cheese here. It needs to be a cooking force worth of heat. Enough to singe and toast the toppings. Cheeses blossom as they melt around the toppings. The high heat toasts the cheeses and the toppings, opening up even more complex flavors. Even the top of the crust gets browning from above. Great pizza isn’t easy. Great pizza is more challenging than great ribs, or great briskets. But don’t fret – there’s hope.
Enter Kettle Pizza –

Kettle Pizza Serious Eats Kit
I was given a Kettle Pizza kit to review. The kit included the pro-grate, tombstone, the baking steel, and a metal pizza peel. This kit right here. My review and feelings towards this product are completely unbiased and objective.
The Kettle Pizza is an accessory that turns your Weber charcoal kettle into a pizza oven. In it’s bare form, it’s an extension sleeve that lifts the lid and provides a slotted access to insert and remove pizzas without losing all of the dome heat. There are upgrades and options available, which I’ll explain below.
Kettle Pizza – Build Quality
We’re all Weber folk. Our grills will outlive us and we’d like our accessories to at least come close. The Kettle Pizza sleeve/extension itself is made with 304 stainless steel. All of the assembly hardware and stand-offs are stainless steel as well, while the wooden handles are unstained and untreated. It’s nice. Not super heavy duty, but it is solid – not cheap or low quality. Even the edges are all smooth and polished.
The Kettle Pizza Prograte is a custom grate that holds a special pizza stone. It’s an upgrade. The Prograte is thick and heavy. Very rigid and well made. The tombstone (pizza stone) is THICK and HEAVY. It’s 5/8″ thick and made with Cordierite – this is the best material for pizza stones. It has great thermal properties and it’s a lot more durable than cheaper ceramic stones. It fits into the Prograte LIKE A GLOVE. Everything is flush and aligned – it’s a thing of beauty!
The baking steel, also an upgrade, sits at the top of the Kettle Pizza, below the lid. It’s cut from .165″ thick stainless steel. It’s freaking heavy and amazing. It can actually function as a griddle, which I’ll show you in another couple of weeks or so. The baking steel fits the pizza oven perfectly. The pizza peel (metal) is ok. It’s heavier and a bit more blunt than I expected – but it works fine.
Kettle Pizza – My Thoughts
I initially didn’t like the way the extension/sleeve thing fit. It’s FAR from airtight. It sits on the bowl of the Weber kettle with some little stand-off bolts. The prograte sits on bolts with wing-nuts. The baking steel sits on bolts. And the Weber lid also sits on bolts. I guess I was expecting a precision fit, like the Cajun Bandit stacker (a bbq product, not pizza). However, after I started cooking pizzas and learning how to use this beast – I realized the open-air fit is intentional. With the Weber converted to a pizza oven, it needs lots of air (and fuel) to bring everything up to temp and keep the flames going.
Assembling the kit was very easy. Much easier than I expected. It was more difficult to unbox than it was to assemble. There’s a lot of heavy things and everything is packaged EXTREMELY well.
Setting it up on a 22″ Weber kettle is easy. Getting the fire going is easy. Getting the whole unit up to 600F+ is easy.
The Kettle Pizza literally turns your Weber grill into a wood fired, fully functional pizza oven. It takes all the hacking and experimenting out of the equipment, and puts it into the food (where it belongs)
That said – making great pizza wasn’t quite as easy. I struggled a bit to get the perfect pizza, but it’s because I’m a pizza snob. I DEMAND thin pizza where the bottom is crispy and the top of the crust is fluffy. Every dough I bought didn’t deliver, and every recipe I found was just too daunting. Jason the Pizza Hero drove up from San Diego and spent the day teaching me how to make dough and make some AMAZING pizza.
Life with a Pizza Oven

The Kettle Pizza brings the whole family together.
Honestly, the Kettle Pizza has changed my life for the better. It has brought my family together and made our bonds stronger. We’ve been making pizzas nearly every weekend. We’ve been inviting friends and family and neighbors over for pizza parties. Everyone gets involved and it’s such a great time. My 11 year old daughter has turned into the dough-master. Even my ‘too cool to talk to dad’ 19 year old daughter joins in!! EVERY. SINGLE. PERSON. that has joined us for pizza has claimed that it was the best pizza of their lives. (Keep in mind I live in SoCal, land of California Pizza Kitchen)
I love the Kettle Pizza so damn much that it’s getting a dedicated grill. My wife loves the Kettle Pizza so much that she approved me getting another grill as a dedicated pizza oven.
Final Thoughts
No matter what kind of pizza you like, the Kettle Pizza will up your pizza game by like a million points. It makes such a big difference, that I can’t even imagine cooking a pizza on my Weber without it. I would each Chuck E Cheese pizza before trying to make another pizza on my Weber without the Kettle Pizza.
If you love pizza, you need a Kettle Pizza.
Please don’t use the Kettle Pizza on vintage colors though, it gets crazy hot and it will damage your grill.
I hope you enjoyed this review. I know it’s not the typical format – but this accessory really changed my life and sticking to a standard review just wouldn’t have done it justice.
Kettle Pizza Kits Comparison
Below is a summary of the different Kettle Pizza Kits, what is included, how its best used, etc.

– Pizza oven sleeve
If you already have a stone or steel, this will be ok. It’s best for lower temp pizzas (400ish). There won’t be enough dome heat to cook quickly from above, so you’ll need to use a lower heat to prevent the bottom crust from burning before the top is done.

– this kit adds a 15″ cordeirite pizza stone (awesome) and a wooden pizza peel
This is a great starting kit. The stone is good, and you NEED a wooden pizza peel anyway. Set another cooking grate on top of the unit, put the pizza pan there (or some fire bricks?) and this will be a kickass starter pizza oven. You still need a metal peel, but this is a good kit to get if you’re comfortable finding a dome modification.

I think this is really the sweet spot as long as you add something to the dome to retain heat. The Prograte and Tombstone are AWESOME. I cooked on Jason’s custom baking steel as well, and it worked great – but the look and feel and fit of the Prograte and the Tombstone are totally worth it.
– comes with Prograte, Tombstone, charcoal basket, metal pizza peel, and the Kettle Pizza itself.

$399 for the cold rolled steel lid
$429 for the stainless steel lid (doubles as griddle)
I’m not very handy. Even if I were, I think the $130 price tag of the stainless baking steel lid is totally worth it. Sure you can find the materials and make all the cuts and get it looking all nice. But time is money and I certainly don’t have the time to make things like this.
This is the full package. Nothing to worry about. Nothing to improve. Get this, and you will have an amazing pizza oven conversion that is easy to use and rock solid.
Both baking steels can be used as a griddle, but the cold rolled one will need to be seasoned and maintained if you plan to use it as a griddle.
Just be warned – with a fully capable pizza oven in your backyard, there’s no more excuses for eating shitty pizza.


As usual, great review, Troy. Thanks. A couple of thoughts:
“It has brought my family together… Everyone gets involved and it’s such a great time.” – Love this aspect of it. First time cooking pizza on our PizzaQue, it was awesome to have all 4 of us out there ACTIVELY involved.
“Please don’t use the Kettle Pizza on vintage colors though, it gets crazy hot and it will damage your grill.” – Oops. (see here: http://weberkettleclub.com/forums/pizza-forum/first-pizza-cook-25365/)
Thanks for the awesome review!
Want to really blow the kids minds? for the last pizza do a thin crust, and top with Chocolate sauce, crushed up graham crackers and mini marshmallows – S’MORES PIZZA! Breakfast pizza is great too – salsa, hash browns, bacon and cheese with an egg in the middle. cook till the egg is sunnyside up.
Great review – i’ve had one for a few years now, and like you said, it really brings the whole family together, and is just a ton of fun. my record for one sitting is 12 pizzas during a party. just keep feeding it wood & charcoal and you can make a day of it.
Great review! How about a close up of that custom tool you used to get more wood on the fire? I’ve been wondering how that’s accomplished with this rig.
Excellent review and I agree totally using a Kettle Pizza does bring everyone together and creates individual ownership of each and every pizza made on the stone.
Thank you for posting such a well thought out and written review article.
With kindest regards to all,
I’m late to the party but I loved reading this. I’ve been meaning to get a legit wood fire oven for pizzas ever since I got married and moved into this house about 7 years ago but about 4 or 5 years ago I realized it was a bit of a pipe dream and just didn’t make much sense and that’s when I found out about the kettle pizza. Ever since I’ve been telling the wife that in going to buy a Weber performer grill and a kettle pizza and that will satisfy my need for an oven.
Time passed and I just didn’t get around to it, now that we are officially renovating the patio I went on and bought the pro kit with the stainless steel plate and I can’t wait for it to arrive. I haven’t even bought the Weber performer yet! I’ll do that in a couple of weeks but there was a sale on the kettle pizza and I had to pull the trigger.
Before this I was making pizzas for my wife and kid on an electric pizza oven and they sure loved it but they have no idea of the new pizza super powers dad has obtained. I’m going to be a hero!
I have just discovered the Kettle Pizza and I’m going to get one.
Could you please share Jason The Pizza Hero’s dough recipe?
This site rocks the Pearsonified Skin for Thesis.
Here's Why Grilling Pizza Makes The Best Homemade Pies
By Allrecipes Staff
Want pizza with a crispy, chewy crust and wonderful smoky flavor? Then put your pie on the grill!
Three pizzas on the grill | Photo by Meredith
Grilled pizzas are a specific style of pie: Typically thin-crusted, they're lightly sauced (because too much sauce spells a soggy crust) with minimal toppings. Also, they cook very fast.
With grilled pizza, the crust is the star. And the first step to getting perfect crust is to par-bake the pizza dough on the grill. (Check out how to make your own pizza dough.)
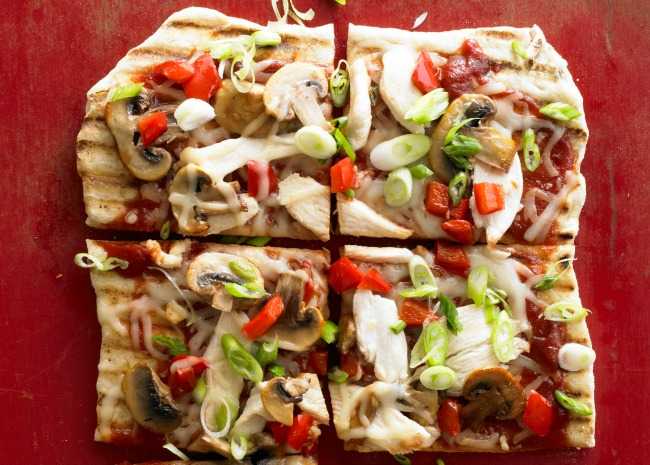
Grilled Pizza with Mushrooms | Photo by Meredith
Grill the Crust
- Prepare the grill for high heat. You can oil the grill's grate, but it's not strictly necessary. Pro Tip: Have all of your toppings ready near the grill because things move fast!
- Dust a baking sheet, a peel, or a plate with flour or cornmeal so the dough won't stick.
- Shape the dough into rounds, either stretching it by hand or using a rolling pin. Each round should be no more than ¼ inch thick. You can stack the rounds by layering waxed paper, parchment, or a clean well-floured kitchen towel in between the individual crusts.
- When the coals are hot, place one dough round on the grill.
- Grill one side just long enough to firm up the crust so you can move it easily. By taking it off the heat, you can take your time arranging the toppings and are less likely to burn the bottom of the pizza.
- After two to three minutes, give it a little tug -- it should move easily. If it sticks, give it another minute or so. Don't worry if the dough droops a little through the grate -- it'll firm up fast.
- Once the crust has set, it should be easy to pull off the heat with tongs, a spatula, or your fingers. Transfer it to a plate or peel; flip it over so the "done" side is up, and add the toppings.
Repeat the process with the rest of the dough rounds.
Grilled Pizza crust getting sauced | Photo by Meredith
Adding Toppings
For toppings, choose a few simple ingredients that can showcase the smoky flavor and crispy crust. Or go minimalist on it: top the grilled bread with a brushing of good olive oil, a sprinkling of coarse salt, and bit of chopped fresh herbs.
Or just make up your own combos:
Simple Sauces: marinara, pesto, flavored olive oil, barbeque sauce, guacamole, salsa verde.
Melty Cheeses: mozzarella, fresh mozzarella, ricotta, goat cheese, Parmesan, Gorgonzola.
Tasty Toppings: grilled vegetables, prosciutto and fresh figs, salami, chicken, fresh herbs, fresh arugula, toasted pine nuts, olives or capers, caramelized onions, roasted garlic.
Here are a few top-rated grilled pizza recipes, with even more ideas for toppings.
Grill Your Pizza
Now back to the grill! Grill the topped pizzas until the cheese melts and the toppings are heated through. Depending upon the heat of the grill and the size of your pies, this can take two to 10 minutes (if your grill has cooled dramatically, you might need to cover it with a lid to finish the cooking)
KettlePizza - Kettle Grill Pizza Accessory
Pizza on the Grill
/kettlepizza-589e85745f9b58819c602d11.jpg)
First of all, pizza is bread, with stuff on it. It is baked like bread, but unlike most of the bread baked in your oven, the secret to the perfect pizza is high temperatures, temperatures higher than your oven can probably reach. What pizza needs is high dry heat, and a smoky environment. Yes, those ancient ovens where pizza was born where wood fired. To make a great pizza what you need is a grill.
I've talked about grilling pizza before, but now I'm going to talk about an accessory that can take your pizza to a whole new level.
The KettlePizza Pizza Oven Kit
The Weber Kettle charcoal grill is the iconic grill of our time and one of the most popular ever sold. If you have a 22.5-inch Weber Grill (including the Weber Performer), the 26.5-inch Weber, or even the new Napoleon Charcoal Kettle then this accessory, might just be the perfect pizza solution. The limitation of grilling pizza is keeping the temperature high. The trouble is, you build the fire, set the pizza stone, and then open the lid to put in the pizza. This causes the grill to lose a lot of the heat it has built up. What Al Contarino has done with his Pizza Oven Kit is figure out a way to convert the kettle grill into a more traditional pizza oven that keeps the lid on and allows the heat to build up and convect around the inside.
Fully assembled and fired up, the grill can easily reach temperatures over 700 degrees, the ideal temperature for cooking pizza. Add a pizza stone (an option with this package) to give it the high-temperature surface that is going to crisp the crust while the cheese melts.
The KettlePizza Pizza Oven Kit is basically a metal ring with an opening in the front.
There are six bolts that go through the 8-inch tall insert. These bolts hold the ring on the grill body and the lid on the insert. The bottom three bolts hold the cooking grate on the same level as the 17 by 3.25-inch opening so that the pizza slides straight in. This also lifts the cooking grate up, away from the fire so that the grill acts more like an oven, heating by convection and less like a grill, heating by direct heat. Build a fire in the back of the grill just like a traditional pizza oven. Place the insert and the cooking grate on the grill and top with a pizza stone (you can use a pizza pan as well which can make getting the pizza in and out easier). Now, put the lid with the vent closed on top of the insert. The fire heats the top section to temperatures above 700 degrees F. There is a thermometer just above the opening to tell the temperature you are cooking at. Simply slide the pizza in through the opening and let it cook. In less than 10 minutes, a 14-inch pizza is cooked to perfection.
Perfect for the Pizza Lover
The KettlePizza Pizza Oven comes in two different versions. The basic setup includes the 304 stainless steel insert ring with its two handles and thermometer and a 15-inch pizza pan.
This runs around $100USD. The deluxe version adds a 15-inch pizza stone and a wooden pizza peel (that large wooden spatula you see in pizza places). The deluxe package runs around $140USD. While a 22.5-inch can be had for less than the basic version of this Pizza Oven this is a quality product and if you are serious about pizza then this is an accessory worth considering. In my tests, I found that this was easy to use and lived up to all its promises.
Disclosure: Review samples were provided by the manufacturer. For more information, please see our Ethics Policy.

Комментариев нет:
Отправить комментарий